Introduction: Mastering Exposure with the Zone System
The Zone System, pioneered by Ansel Adams and Fred Archer over 80 years ago, is a technique that offers photographers a way to control exposure and capture the entire tonal scale in their photographs. This system revolutionized the field of film photography and remains a powerful skill for any aspiring photographer wishing to elevate their craft. When you understand and use the Zone System in your own photography, it empowers you to translate the complex world of light and shadow into zones that range from pure black to pure white.
This guide will demystify the Zone System and offer practical tips on how to use it in your photographic journey. Whether you’re an amateur seeking to enhance your skills, or a seasoned pro looking to refine your craft, understanding and using the Zone System will add a new dimension to your photography.
Zones and Tonal Values: The Essence of the System
At the core of the Zone System is the concept of zones. Imagine a scale from the Roman numeral 0 to X, where each number represents a different tonal value in a photograph. Zone 0 symbolizes pure black, devoid of any discernible detail. This is akin to the darkest shadow you can visualize, where no texture or detail can be distinguished.

On the other end of the scale, we have Zone X, representing pure white. This zone is the purest form of white, symbolizing brightness so intense that no further detail can be observed; it’s akin to staring directly at the sun or a bright light source.
Between these two extremes, Zones I to IX, are the gradations of gray. Each zone represents a step in tonality, progressively getting lighter as we move from Zone I to Zone IX. These mid-tone zones are where the majority of the details and textures in a photograph are observed, and they create the depth and dimension that make an image truly come to life.
Below is a simple description of each of the zones:
- Zone 0: Pure black with no detail.
- Zone I: Close to black, with slight tonality but no texture.
- Zone II: Deep black, with the first appearance of minimal details in the shadows.
- Zone III: Dark gray, with some detail and texture starting to become visible.
- Zone IV: Moderate gray, showing clear details in the shadows, ideal for dark foliage and landscapes.
- Zone V: Mid-gray, perceived as “average” or “18% gray”, often used for exposing the film, showing a clear separation of tones. This is ideal for a clear blue sky.
- Zone VI: Light gray, representing soft skin tones and light stone or concrete, showing more pronounced details.
- Zone VII: Very light gray, containing a lot of detail, ideal for bright skin tones, light-colored objects, and areas of sky.
- Zone VIII: Textured whites, representing the brightest area of the subject having texture.
- Zone IX: Slightly detailed white, nearly the brightest white, showing very little texture.
- Zone X: Pure white with no detail, the brightest possible value, like direct sunlight or reflections from shiny surfaces.
Understanding and using these zones is the foundation of the Zone System in photography. It allows you to visualize and manipulate tonal values, paving the way for striking and intentionally crafted images. We’ll dive more into how to use the zones to your advantage later in this guide.
Ansel Adams’ Legacy: The Man Behind the Method
Ansel Adams, a renowned American landscape photographer and environmentalist, was integral to the development of the Zone System. His exceptional ability to capture the grandeur of nature was heavily influenced by his use of this technique. Adams’ pioneering work in understanding and using the Zone System in photography began in the 1930s, in collaboration with fellow photographer Fred Archer. The duo aimed to create a technique that allowed photographers to precisely control the tonal range in their images, a groundbreaking achievement in the world of photography at the time.
Adams’ work is characterized by remarkable tonal range, capturing the smallest of details from the darkest shadows to the brightest lights. His images, rich in depth and detail, showcased the potential of the Zone System in transforming ordinary photographs into extraordinary works of art. One of his most famous photographs, “Moonrise, Hernandez, New Mexico,” exemplifies his use of the Zone System. The image’s dramatic contrast, from the luminous moon to the dark foreground, shows the range of tonal values that can be achieved by using the Zone System.
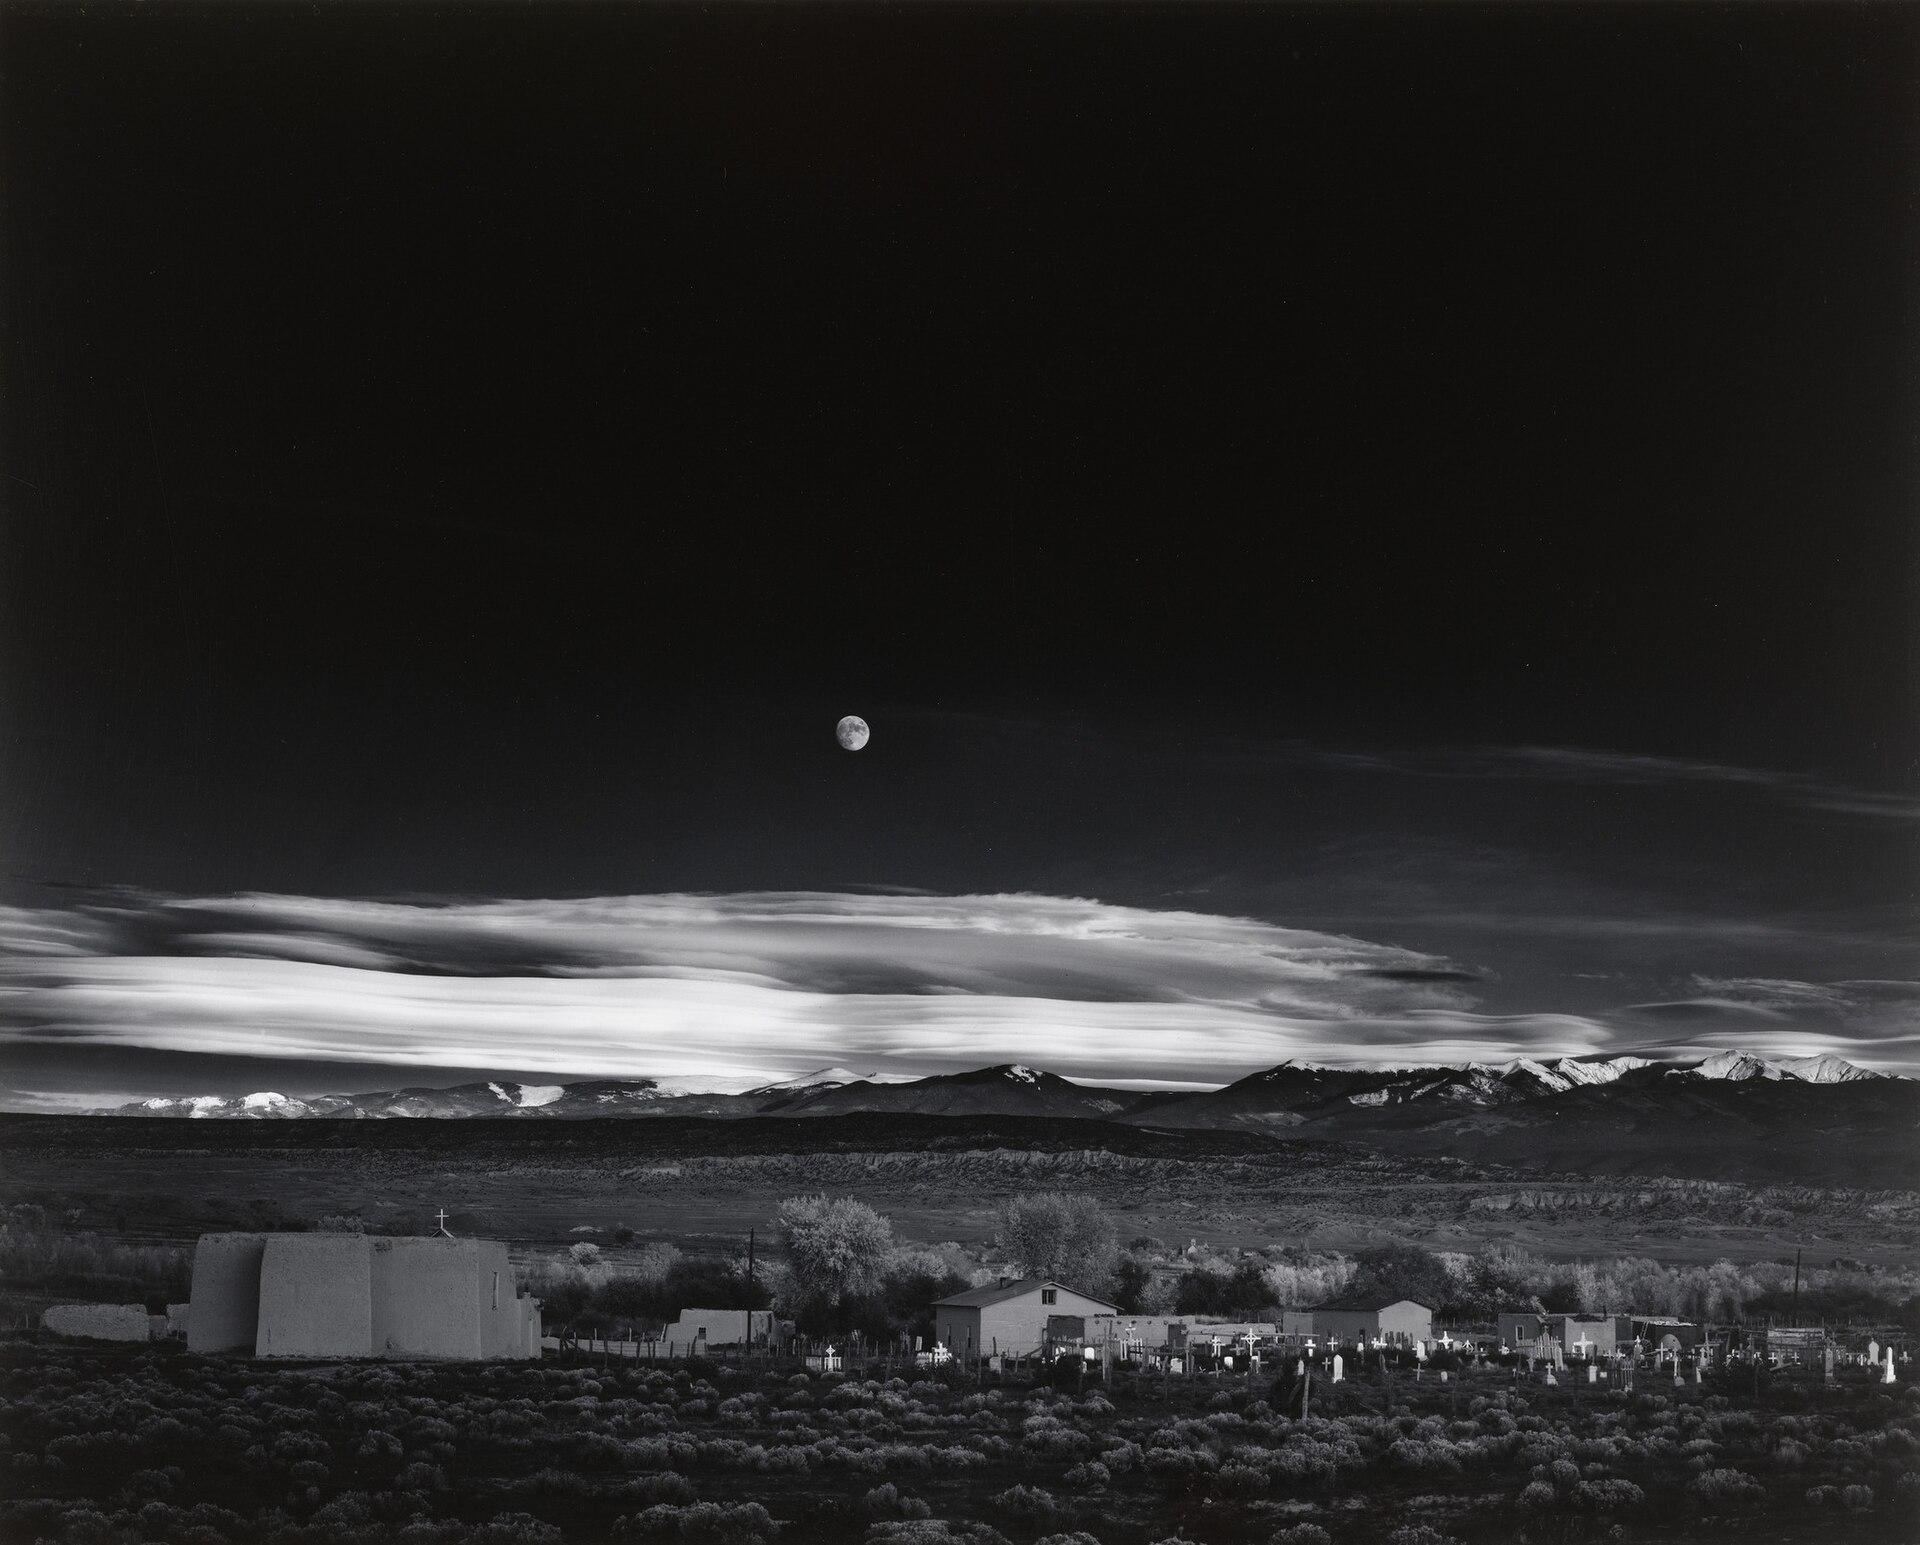
Moonrise, Hernandez, New Mexico (1941) by Ansel Adams
The influence of Ansel Adams and the Zone System extends far beyond Adams’ lifetime. Today, it remains a fundamental technique for photographers worldwide, helping them understand light, exposure, and tonality. The ability to control these elements allows photographers to lend their artistic interpretation to their images. You could say the Zone System, thanks to Adams, stands as an enduring testament to the mastery of light and shadow in photography.
Controlling Exposure: How Zones Shape Your Image
Controlling exposure is one of the most critical aspects of understanding and using the Zone System in photography. This system provides a framework for photographers to manipulate the exposure in a scene, allowing them to craft the scene in black-and-white shades with precision.
Each zone in the Zone System corresponds to a specific tonal value and exposure adjustment. For instance, Zone V is the middle gray, or 18% gray, which most meters are calibrated to. This zone represents a tonal value halfway between pure black (Zone 0) and pure white (Zone X). This makes Zone V a critical reference point for exposure metering. A light meter aimed at a subject that you want to appear as middle gray in your photo, and calibrated to Zone V, will render an accurate exposure.
Likewise, every other zone on either side of Zone V corresponds to a doubling or halving of the light—known as a “stop” in photography-speak. For example, Zone IV is one stop darker than Zone V, representing darker details such as dark skin, deep shadows, or dark stones. Conversely, Zone VI is one stop brighter than Zone V, presenting lighter details like light skin, light stone, or snow on an overcast day.
By understanding these correlations, photographers can use the Zone System to make precise exposure decisions. For example, if you want to darken the tones in an image, you can expose for a higher zone (making the image overall darker). On the other hand, if you want to brighten the image, then expose for a lower zone (making the image overall lighter).
Zone Metering and Modern Camera Advancements
Today’s digital cameras, with their advanced metering systems and in-camera processing, offer a simplified, yet nuanced approach to leveraging the Zone System. Many cameras today feature built-in spot metering, a function that measures the light reflecting off a small area of the scene. This feature allows photographers to meter specific zones in their frame, offering them the ability to assign tonal values just as in the Zone System.
The introduction of Histograms on digital cameras has revolutionized how photographers visualize and control tonality. The Histogram, essentially a graphical representation of tonal values in a photograph, can be likened to a digital variant of the Zone System. It allows photographers to view the distribution of tones in an image – from the darkest black on the left (akin to Zone 0) to pure white on the right (Zone X). Thus, photographers can make precise adjustments to exposure, ensuring that the image spans the tonal range without losing details to extreme shadows or highlights.
Additionally, today’s cameras offer RAW capture, a format that preserves all the data from the sensor, providing greater latitude for post-processing. Using software like Adobe Lightroom or Photoshop, photographers can manipulate the tones in their images with unprecedented control, effectively applying the principles of the Zone System after the photo has been taken.
So whether you’re metering light for different zones in your frame, adjusting settings based on a Histogram, or manipulating tones in post-processing, the principles of the Zone System remain as relevant today as they were in Ansel Adams’ era.
Real-World Applications: When to Use the Zone System
The Zone System can be effectively applied in a variety of real-world scenarios. Consider a high-contrast scene, such as a landscape with a bright, sunlit sky and a dark, shadowy foreground. Navigating such a broad dynamic range can be challenging, but with the Zone System, you can determine the exposure for the sky and the foreground separately, ensuring both areas have sufficient detail and fall within the range your camera sensor can capture. The result is a balanced photograph with rich tones — one that accurately replicates the scene as observed by the human eye.
The Zone System holds immense value in both fine art and black-and-white photography. It provides artists with a tool to manipulate contrast and texture, two critical elements in these genres. For instance, by placing the dark tones of a subject in a specific zone, you can emphasize texture and form, giving the image more drama. The Zone System, therefore, is not just a technical tool; it is also a conduit for artistic expression. Using the Zone System can transform the way photographers perceive and capture the world.
Here are a few examples for finding the right zone:
- If you’re shooting outdoors and the interesting clouds are a priority, put them in Zone VIII to preserve their texture.
- When taking portraits, Black skin typically falls into Zone IV while white skin is usually in Zone VI.
- If you want to make sure there is texture in the shadows, put them in Zone II.
In other words, when using the Zone System, choose what is most important to you and expose for that. Everything else will fall into place.
Going Digital: Adapting the Zone System to the Digital Age
So, how can you apply the 80-year-old Zone System to modern-day digital cameras?
Adapting the Zone System to digital photography revolves around understanding how the system’s principles apply to the digital workflow. This starts with capturing the image. Modern cameras have dynamic range capabilities that allow photographers to capture a broad spectrum of tonal values, similar to the different zones of the Zone System. It’s important to ensure your camera settings are optimized for capturing the maximum dynamic range. This means shooting in RAW format as it records all the image data captured by the sensor, giving you greater flexibility to modify the image during post-processing. You will also need to set your camera to spot metering.
Use your camera’s spot meter and fill the frame as much as possible with what you’re metering. If you’re measuring someone’s forehead, for example, fill the frame with their forehead. The same goes for a mountainside or a flower petal. Precisely meter the object. Then, adjust your exposure until the meter reads “0”. Now, you’re in Zone V.
Now, you simply increase or decrease the stops (using aperture, shutter, and/or ISO) by the same amount of zones you want to move. Remember, a zone represents a stop.
Here’s a catch: The Zone System follows a principle there are ten stops between pure black and pure white. However, thanks to advances in sensors and processors, many of today’s cameras let you process a photo with 14 or 16 stops. So what do you do? Just create your own system with 14 or 16 zones instead of 10. It works the same way.
The Zone System also applies to the post-processing stage. Digital photo editing tools like Lightroom and Photoshop allow you to manipulate the tonal range in your image with precision. Using these tools, you can adjust the exposure of specific areas (or ‘zones’) of your image to highlight or downplay certain elements, much like you would with the Zone System.
Conclusion: Elevating Your Photography Through the Zone System
Understanding and using the Zone System in photography equips you with an invaluable toolset for artistic control over exposure and tonality. This system, pioneered by Ansel Adams, has withstood the test of time and survived technological advancements — proving its fundamental role in the art of photography.
Regardless of whether you’re using spot metering on a modern digital camera, adjusting settings based on a Histogram, or refining tones during post-processing, the Zone System remains relevant and effective. Today, even with digital photography, applying the Zone System’s principles can elevate your work. The Zone System, therefore, remains an essential component of a photographer’s journey toward artistic expression.