As photographers, we often find ourselves in a constant dance with light, seeking ways to shape and control it to enhance our images. Whether we’re working on portraits, studio shots, or product photography, mastering light manipulation is essential for achieving professional results. One fundamental concept that can significantly elevate our lighting game is the inverse square law.
The inverse square law may sound intimidating at first, conjuring images of complex equations and scientific theories. However, it’s a straightforward principle that describes how light behaves as it travels from its source. Understanding this law can empower us to predict and control light intensity, making our photographic setups more consistent and our images more striking.
In this article, we’ll demystify the inverse square law, breaking down its scientific roots into easy-to-understand explanations. We’ll explore practical applications in various photographic contexts, offering actionable advice on how to use this knowledge to create more controlled and dynamic lighting setups. By the end of our journey, you’ll be equipped with the tools to experiment with light in new ways, fostering a deeper understanding and creativity in your work.
What is the Inverse-Square Law?
The inverse square law is a fundamental principle in physics that describes how the intensity of light (or any other point source of energy) decreases with distance. In simpler terms, as you move away from the light source, the light’s intensity diminishes.
Inverse-Square Law: The intensity of light is inversely proportional to the square of the distance from the light source.
Here’s the mathematical formula:
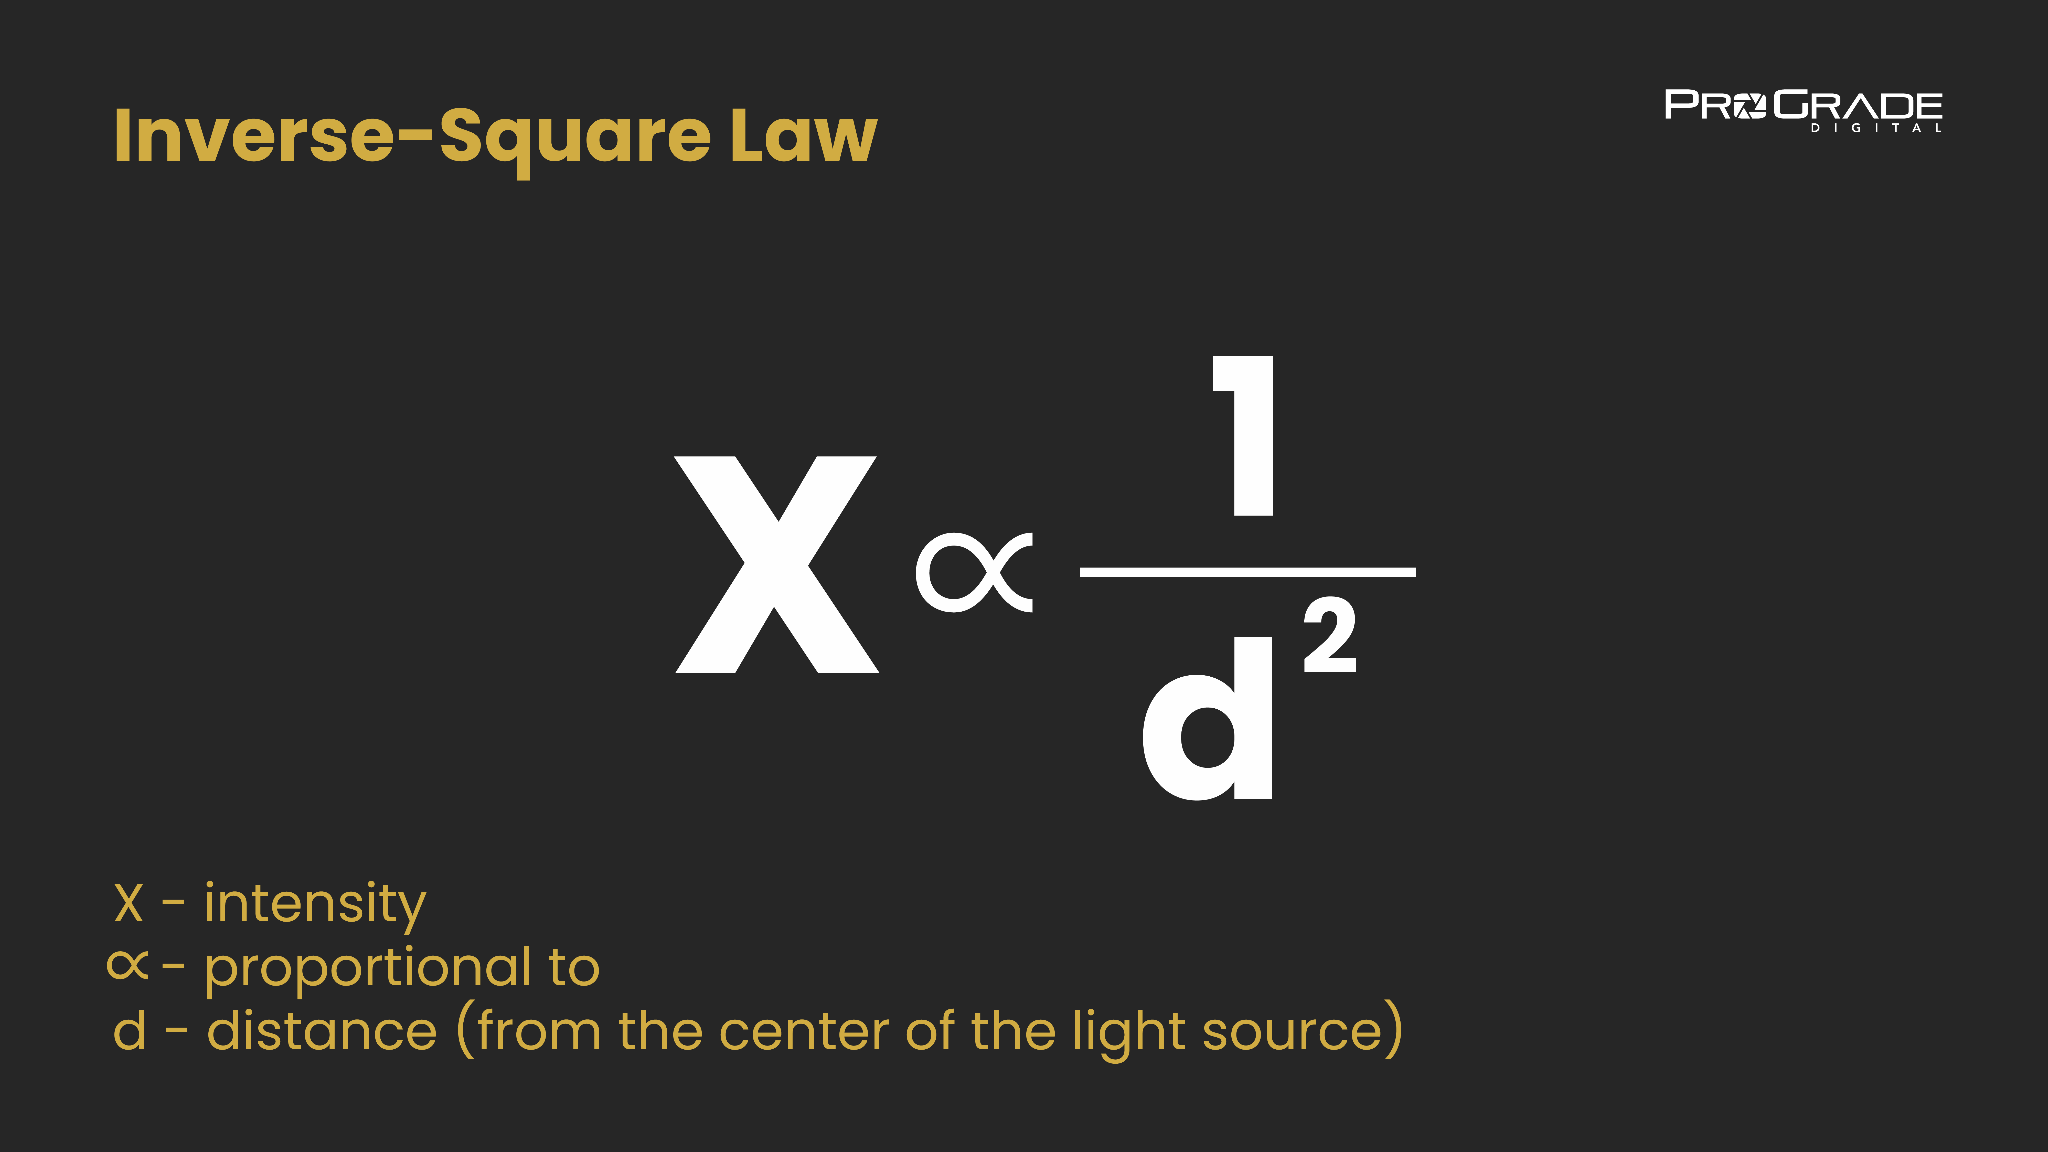
In essence, this means that as you move further away from the source, the light spreads over a larger area, and its intensity decreases rapidly. Let’s look at a visual example to better grasp how the inverse square law works in practical terms. Here’s a diagram to illustrate this concept:
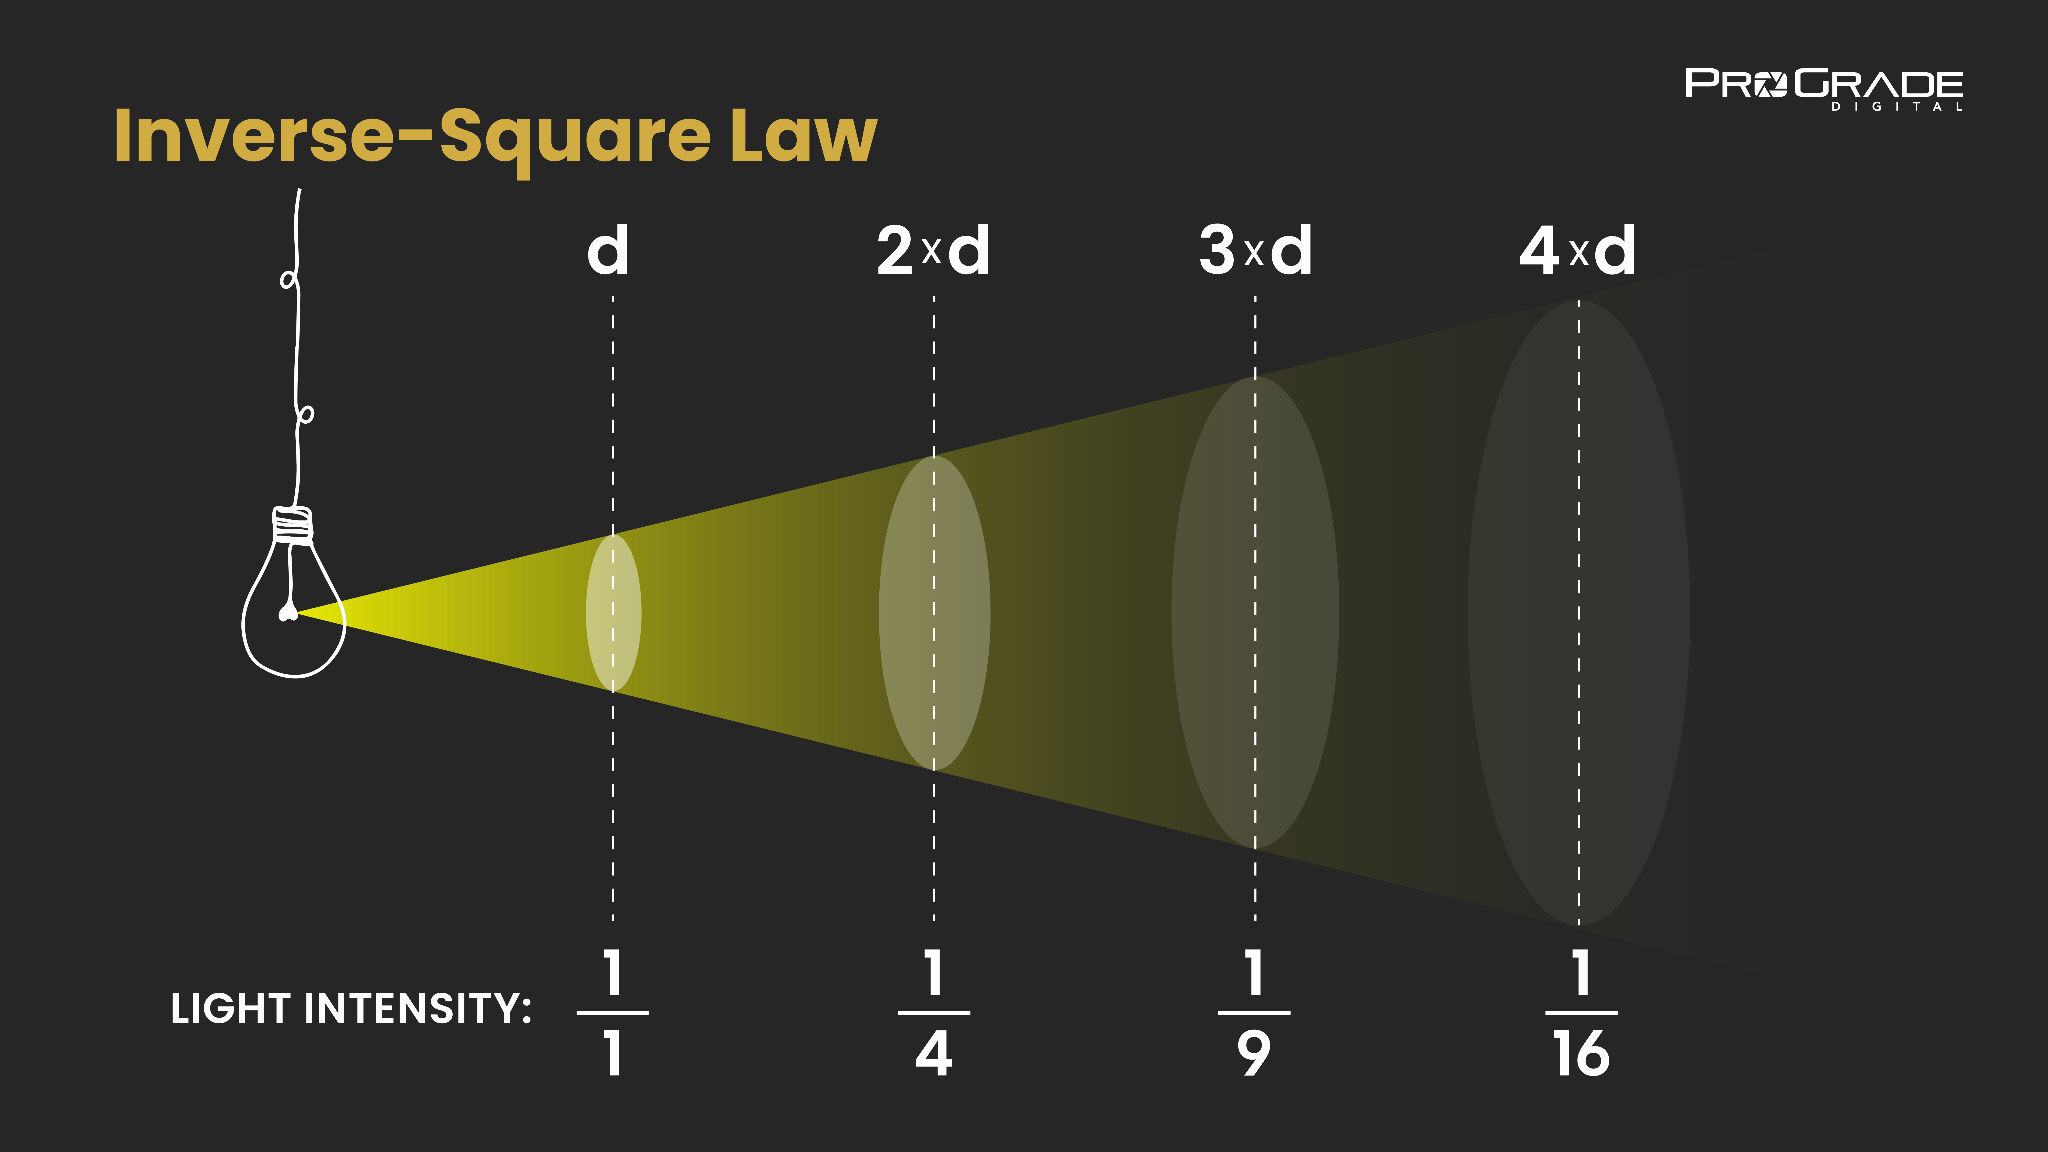
Initial Distance (d):
At a distance d from the light source, we establish the baseline intensity. This baseline intensity is denoted as 1 or 1/1, representing the reference point for measuring how light intensity changes with distance.
Doubling the Distance (2d):
When the distance from the source is doubled (to 2d), the light now spreads over an area that is four times larger than at distance d. As a result, the light intensity at this distance is only one-fourth (1/4) of the baseline intensity.
Tripling the Distance (3d):
At three times the initial distance (3d), the light spreads over an area nine times larger. Consequently, the intensity drops to one-ninth (1/9) of its initial value.
Quadrupling the Distance (4d):
At four times the initial distance (4d), the light covers an area sixteen times larger, reducing the intensity to one-sixteenth (1/16) of the original intensity.
Throughout this article, we will refer to distances from the light source using the same d. This will help us establish a consistency for discussing how light intensity changes with distance.
Note that it does not matter where in the light beam you “put” the d (so to speak). For example, say you measure light intensity standing exactly 1 meter from the light source, and your photometer reads 100 lux. In this case, 2d, where the light intensity drops to 1/4 of the baseline (25 lux), is 2×1 meter, and 3d, where the intensity drops to 1/9 of the baseline, is 3×1 meter, and so on. At the same time, if you establish a baseline (d) at 15mm from the light source, the 2d is 2x15mm=30mm, 3d is 3x15mm=45mm, and so on.
Applying the Inverse Square Law in Photography
The Inverse-Square Law is an essential concept in photography, helping photographers understand how light intensity changes with distance. Mastering this principle can enhance your lighting setups, simplify controlling exposure, and create stunning visual effects. Here are some practical tips on applying the Inverse-Square Law in photography:
Positioning Lights: Small Distance Changes Matter
A slight adjustment in the light source distance can drastically alter the exposure. As you can see from the image above, moving a subject from d to 2d reduces the intensity by 75%; at 3d, the intensity is reduced by 88,89%.
Positioning your light source closer to your subject provides more intense illumination. This is ideal for highlighting specific areas or creating strong contrasts.
Contrarily, place your light source further away from the subject for softer, more flattering light. This will reduce the light intensity and spread it more evenly across the subject, minimizing harsh shadows.
Practical Tip: Use a light meter to measure the intensity at different distances and adjust accordingly to achieve the desired effect.
Controlling Exposure: Using the Inverse-Square Law
In professional photography, precise control over exposure is paramount. The Inverse-Square Law provides a reliable framework for adjusting light intensity to achieve the desired exposure. Here’s how you can leverage this principle to fine-tune your lighting setups:
Proximity for Increased Brightness:
When you position your light source closer to the subject, the intensity of light increases exponentially. For instance, halving the distance between the light and the subject (from d to 0.5d) results in an intensity that is four times greater. This approach is particularly useful for high-key photography or when emphasizing detail and texture.
Distancing for Reduced Brightness:
Conversely, increasing the distance between the light source and the subject decreases the light intensity. Doubling the distance (from d to 2d) reduces the light intensity to one-quarter. This technique helps create low-key images, soften shadows, and reduce the risk of overexposure.
Consistency in Exposure:
Mark the distance of your light sources to maintain consistent exposure across different shots. For fixed setups, use tape or markers on the floor. This ensures repeatable lighting conditions that facilitate consistent exposure across sessions.
Balancing Multiple Light Sources
Harmonizing Intensity: Key and Fill Light Balance
When using multiple light sources, understanding key and fill light relative intensities is vital. For example, if your key light is at d and your fill light is at 2d, the fill light will be one-quarter as intense as the key light. This ratio helps create a natural gradient of light and shadow, adding depth and dimension to the photograph.
Lighting Ratios: Establishing Precise Ratios
You can use the Inverse-Square Law to establish precise lighting ratios. For portrait photography, a common lighting ratio is 3:1, where the key light is three times as intense as the fill light. So, if you can’t dim your lights, you can simply adjust the distances of your lights accordingly to achieve the desired ratio, enhancing the mood and style of the image.
Advanced Techniques for Creative Control
High Contrast Lighting: Dramatic Effects
Positioning the light source very close to the subject can create stark, dramatic lighting with high contrast and sharp shadows. This technique is effective for artistic portraits and product photography, emphasizing detail and texture.
Subtle Light Gradation: Even Illumination
For group shots or large subjects, position the light source further away to ensure even illumination. By placing the light source at 4d you cover 16 times greater area compared to d. That way, you can achieve a more uniform light spread, minimizing the fall-off effect and ensuring all subjects are evenly lit.
Spotlighting and Isolation: Focused Lighting
Use the law to create spotlight effects by keeping the light source close to the subject while ensuring the background is much further away. This isolates the subject with intense illumination, leaving the background in relative darkness, ideal for theatrical and portrait photography.
Case Study: Analysis of the Image
The following image is an excellent example of how a single light source, placed very close to the subject, creates strong contrast and dramatic lighting.

In this photograph, the primary light source is positioned very close to the subject, likely from a window or an artificial light positioned to the left. This proximity results in a high-intensity light that illuminates the left side of the subject’s face and upper body with significant brightness.
The close placement of the light source creates a steep light fall-off, which is characteristic of the Inverse-Square Law. This fall-off is evident in the strong contrast between the lit and shadowed areas. The left side of the subject’s face is brightly illuminated, highlighting details and textures, while the right side falls into deep shadow, adding a dramatic effect to the image.
The strong contrast produced by the single, close light source enhances the subject’s three-dimensionality. The shadows create a sense of depth, making the subject appear more lifelike and engaging. This technique draws the viewer’s attention to the subject’s face, particularly the eyes, which are well-lit and serve as a focal point.
The high contrast and deep shadows contribute to a moody and introspective atmosphere. The lighting emphasizes the subject’s thoughtful pose and expression, adding emotional depth to the portrait. This use of lighting is particularly effective for creating compelling and expressive portraits.
Using Inverse-Square Law: Practical Example
The following image serves as a great example of how the Inverse-Square Law can be applied in portrait photography to achieve beautifully controlled lighting.

In this portrait, the subject is illuminated in a way that highlights her features while maintaining a soft, natural look. The light sources are precisely positioned to bring out the beautiful freckles on her face and hands.
The effective use of the Inverse-Square Law is evident in how the light intensity transitions smoothly across the subject, maintaining even exposure while creating depth and dimension.
Here’s how you can achieve a similar result:
Step 1: Place the primary light source, likely a softbox or a diffused light, relatively close to the subject. By positioning the light source at a short distance, you will ensure that the intensity of the light is strong enough to highlight the subject’s features (such as the freckled skin) while maintaining a gentle fall-off, which creates a smooth gradient of light across the face.
Step 2: Place a fill light or a reflector at a greater distance to soften the shadows created by the key light. If you look closely, you can see that the key light on the right side is noticeably more intense—about three times stronger than the fill light coming from the left. This difference in intensity can be observed in the highlights on the subject’s face and the gradual transition to softer shadows on the left side. Carefully balanced use of key and fill light ensures the lighting remains flattering and natural.
In short, this image illustrates the effective use of the Inverse-Square Law in portrait photography. By balancing the intensity of key and fill lights, the photographer has managed to create a well-lit, compelling portrait with excellent depth and dimension.
Troubleshooting Common Lighting Issues
Understanding and applying the Inverse-Square Law is essential for achieving well-balanced lighting in photography. However, it can also introduce challenges, particularly with harsh shadows and varying shooting environments. Here are some solutions and tips for dealing with these common lighting issues.
Dealing with Harsh Shadows
Harsh shadows are often the result of improper lighting setups where the light source is either too close or not diffused enough. Here are some strategies to mitigate harsh shadows:
1. Diffusing the Light:
Using diffusers, such as softboxes, umbrellas, or even a sheer cloth, can soften the light before it reaches the subject. This spreads the light more evenly and reduces the intensity of shadows. For example, in portrait photography, a softbox can help create a more even light distribution across the subject’s face, minimizing harsh shadows.
2. Adjusting Light Distance:
If the light source is too close and creates intense shadows, try moving it slightly further away. This adjustment reduces the light intensity gradient and helps in achieving a more balanced exposure. However, be mindful of the fall-off effect, and adjust the exposure settings accordingly.
3. Using Fill Lights:
Incorporate fill lights to soften shadows. Place a fill light on the opposite side of the key light but at a greater distance or with reduced intensity. This secondary light helps to fill in the shadows without overpowering the primary light source.
4. Reflectors:
Using reflectors is another effective way to soften shadows and even out the overall light. Position a reflector opposite the light source to bounce light back onto the subject and redirect light into shadowed areas.
Adjusting for Different Environments
Applying the Inverse-Square Law effectively in various shooting environments, such as large halls or outdoor settings, requires specific considerations. Let’s examine them closer.
1. Large Indoor Spaces:
In large halls or studios, the distance between the light source and the subject can be more substantial. Here’s how to manage lighting in such environments:
- Multiple Light Sources: Use multiple lights to cover larger areas evenly. Position them strategically to avoid creating unintended shadows and to ensure uniform lighting.
- Ceiling or Wall Bounce: Bounce the light off ceilings or walls to create a softer, diffused lighting effect that reduces harsh shadows and provides even coverage.
- Light Modifiers: Utilize light modifiers such as barn doors, grids, or flags to control the spread and direction of light, ensuring it reaches the subject effectively without creating unwanted shadows.
2. Outdoor Settings:
Outdoor photography presents unique challenges due to varying natural light conditions. Here’s how to apply the Inverse-Square Law outdoors:
- Natural Diffusion: Use natural elements, like tree canopies or buildings, to diffuse direct sunlight and reduce harsh shadows.
- Portable Diffusers and Reflectors: Carry portable diffusers and reflectors to manage and manipulate natural light. Reflectors can bounce sunlight into shadowed areas, while diffusers can soften direct sunlight.
- Golden Hour Shooting: Take advantage of the golden hours (early morning or late afternoon) when the sunlight is naturally diffused and less intense, reducing the likelihood of harsh shadows.
IMPORTANT: Understanding Where the Inverse Square Law Does Not Apply
Not understanding where the inverse square law does not apply, can also lead to significant lighting issues. Misapplying this law can result in inconsistent lighting, where the expected rapid fall-off in light intensity does not occur, leading to improperly lit subjects and unintended shadows, ultimately affecting the overall quality and professionalism of the images.
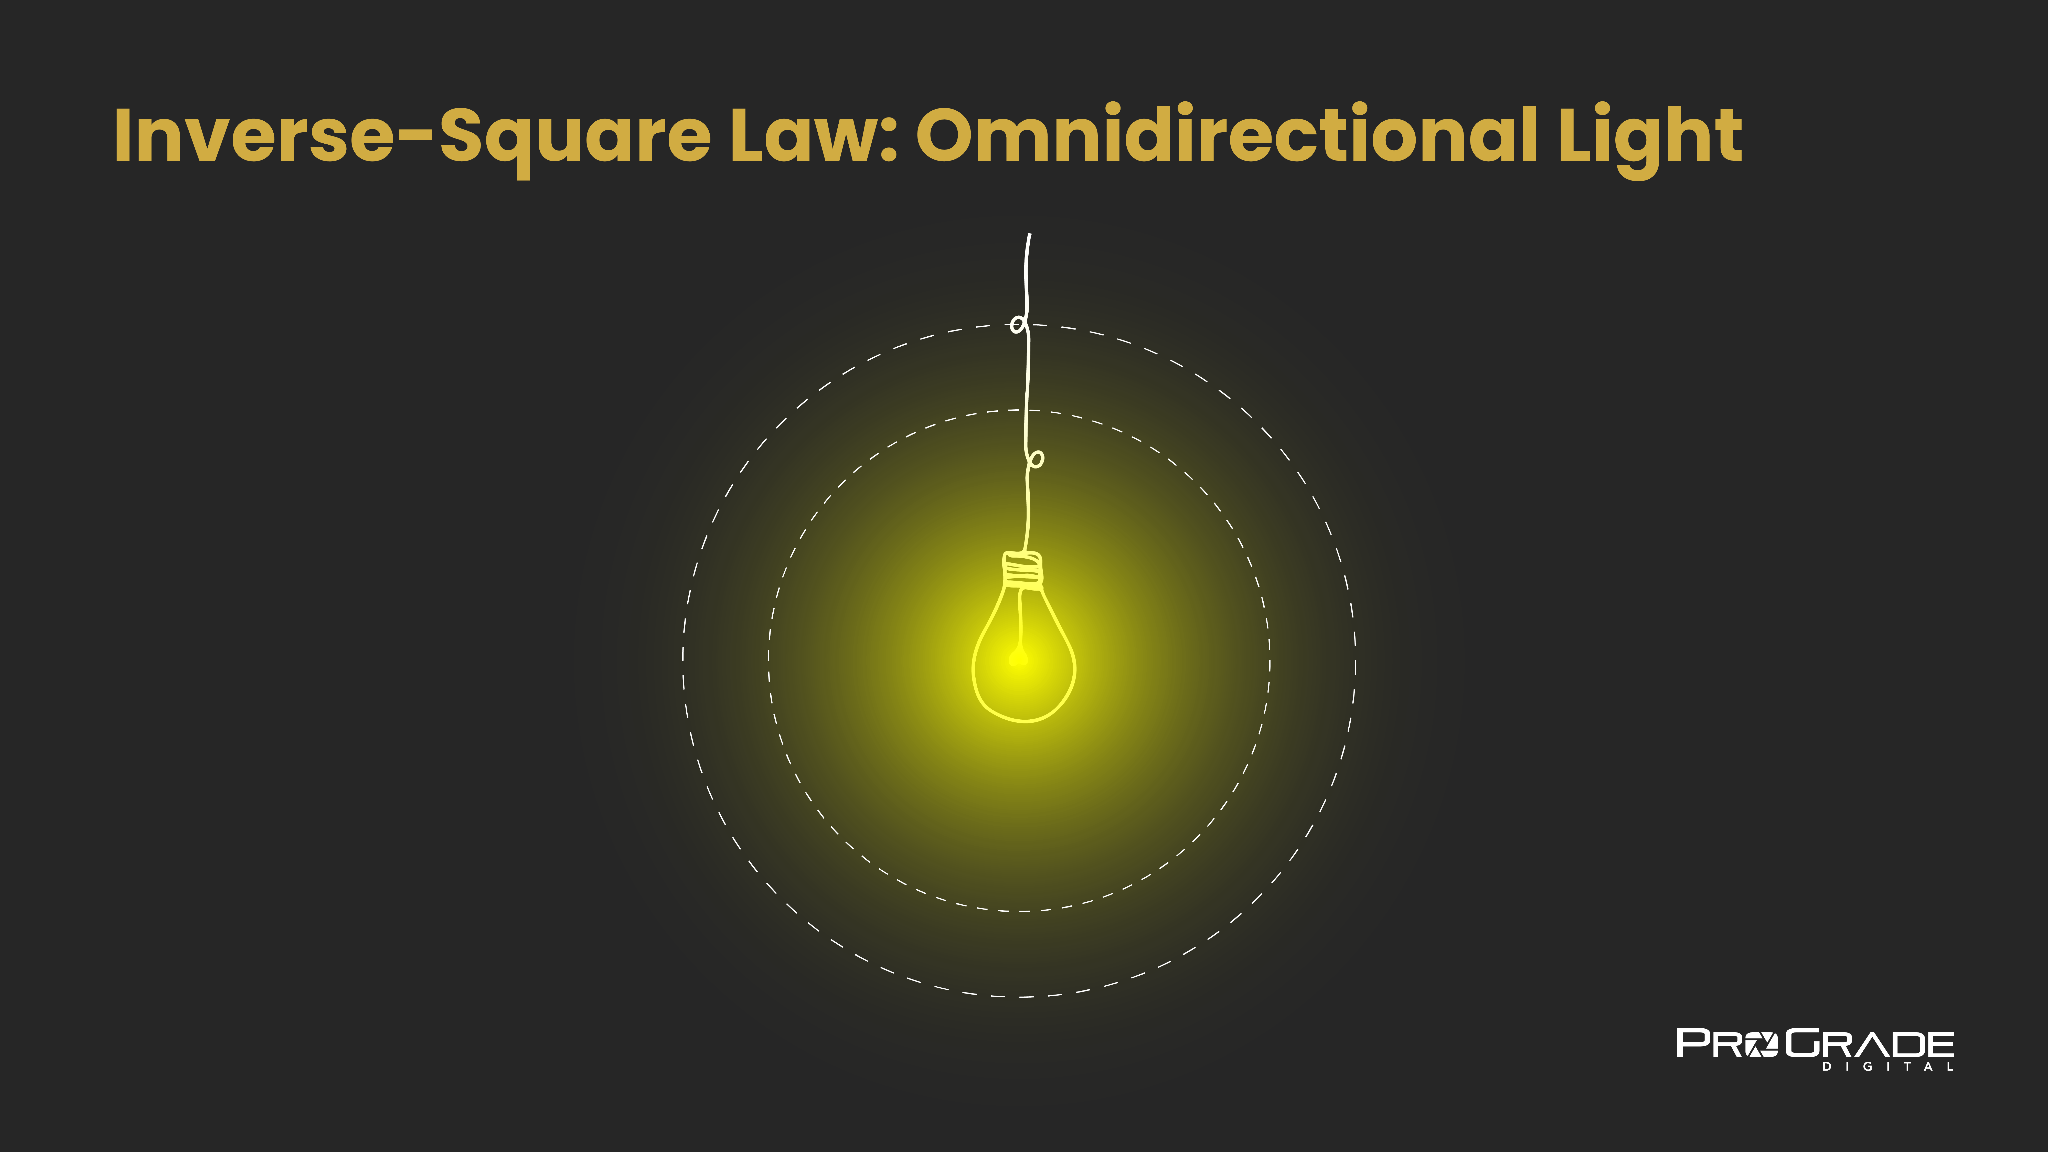
Inverse Square Law and Omni-Directional Light
As mentioned over and over, the Inverse Square Law is a principle that explains how the intensity of light decreases with distance from a light source. However, this applies only when light spreads out uniformly in all directions; its intensity diminishes rapidly as the distance from the source increases. This relationship is due to the geometry of a sphere: as the light expands, the surface area it covers increases by the square of the distance, thereby reducing the light’s density and intensity in a given area.
Non-Applicability to Collimated Light
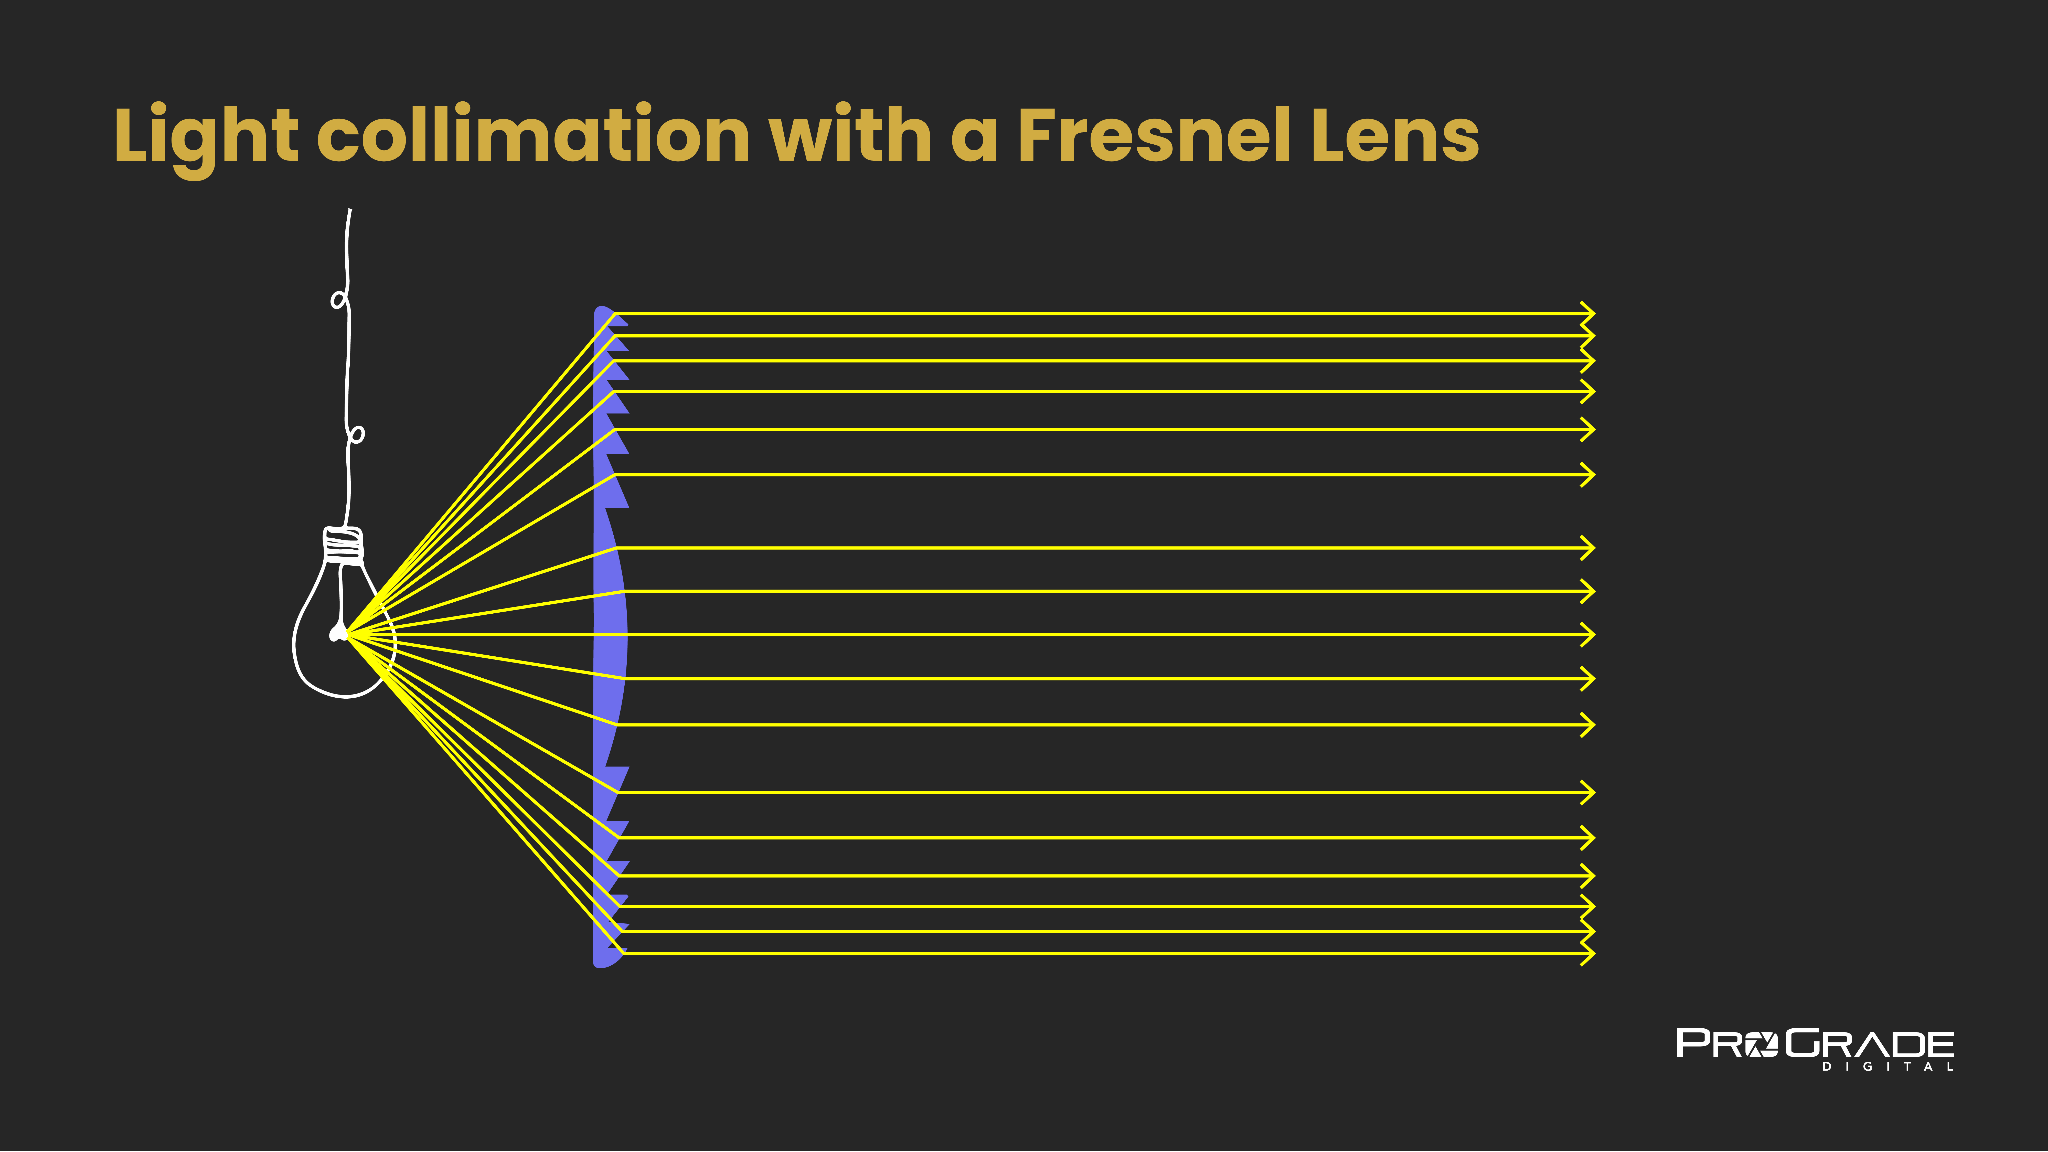
The inverse square law does not apply to collimated or focused light, such as that produced by parabolic reflectors or Fresnel lenses. These types of lighting modifiers direct the light into a narrow, directional beam, minimizing the spread of light rays. Because the light rays remain more concentrated, the decrease in intensity over distance is significantly less pronounced compared to omnidirectional light.
Why is Collimated Light Different?
For collimated light, the intensity remains relatively constant over longer distances because the light rays do not disperse widely. Instead of following the inverse square law, the behavior of collimated light is often better explained by principles of beam divergence or Gaussian beam propagation.
1. Beam Divergence
Collimated light, such as that from a parabolic reflector, has minimal divergence, meaning the beam’s cross-sectional area changes very little over distance. Consequently, the intensity stays higher for longer distances.
2. Gaussian Beam Propagation
For highly collimated light sources like lasers, Gaussian beam optics describe the light propagation. This involves factors like the beam waist and Rayleigh range, which detail how the beam spreads over distance. Despite some spreading, the intensity decrease is much slower compared to omni-directional light.
Understanding the difference in how light behaves with different modifiers is critical for photographers aiming to achieve precise and consistent lighting effects in their work. This ensures that they can effectively manipulate light to create the desired mood, highlight subjects, and maintain control over the overall visual impact of their images.
Studio Setups: How the Inverse-Square Law Affects Each Configuration
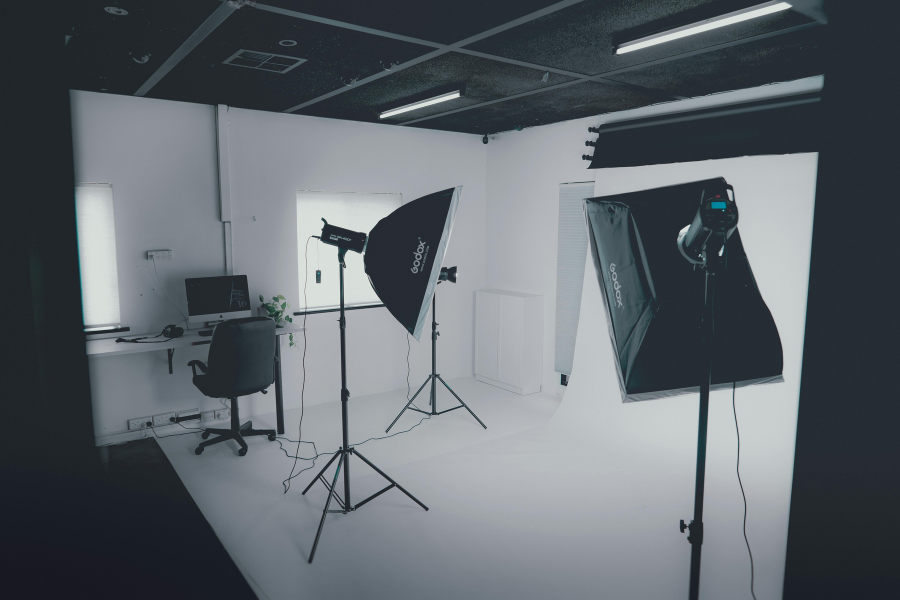
The Inverse-Square Law plays a paramount role in determining the effectiveness of various studio lighting setups. By understanding how, you can better control light intensity and distribution to achieve desired results. Here’s a discussion on different studio lighting setups and how the Inverse-Square Law impacts each configuration.
Three-Point Lighting
Three-point lighting is a foundational setup in studio photography, consisting of a key light, fill light, and backlight. Each light serves a specific purpose, and their placement significantly influences the overall lighting effect.
Key Light:
- Position: The key light is the main light source and is typically placed at a 45-degree angle to the subject.
- Impact: The Inverse-Square Law dictates that the closer the key light is to the subject, the more intense the light and the quicker the fall-off. This proximity can create strong highlights and shadows, adding depth to the subject. Moving the key light further away reduces its intensity and spreads the light more evenly, resulting in softer shadows.
Fill Light:
- Position: The fill light is placed opposite the key light to fill in shadows created by the key light.
- Impact: By positioning the fill light further from the subject than the key light, the intensity is naturally lower due to the Inverse-Square Law. This ensures that the fill light softens shadows without overpowering the key light, maintaining the balance between light and shadow.
Backlight (Rim Light):
- Position: The backlight is placed behind the subject to separate them from the background.
- Impact: The distance of the backlight from the subject affects the intensity of the rim light. A closer backlight will create a more pronounced rim effect, highlighting the edges of the subject. Moving it further away softens this effect, providing a subtle glow.
High-Key Lighting
High-key lighting aims to create a bright, evenly-lit scene with minimal shadows. This setup is popular in fashion, beauty, and product photography.
Setup:
- Multiple Light Sources: High-key lighting typically involves several light sources placed around the subject to eliminate shadows and ensure uniform illumination.
- Impact: The Inverse-Square Law is essential in this setup as it helps balance the intensity of multiple lights. By positioning all lights at equal distances from the subject, photographers can achieve an even spread of light. If one light is closer than the others, it will be noticeably brighter, disrupting the high-key effect.
Low-Key Lighting
Low-key lighting focuses on creating dramatic, high-contrast images with deep shadows. This setup is often used in portrait and artistic photography.
Setup:
- Single or Few Light Sources: Low-key lighting usually involves a single key light or minimal additional lighting to maintain dark areas in the frame.
- Impact: The close placement of the key light to the subject intensifies the light and enhances shadow contrast due to the rapid fall-off described by the Inverse-Square Law. This positioning creates striking highlights and deep shadows, emphasizing the subject’s features and adding mood to the image.
Clamshell Lighting
Clamshell lighting is commonly used in beauty and portrait photography to achieve soft, flattering illumination with minimal shadows.
Setup:
- Two Light Sources: Typically involves a key light positioned above the subject and a fill light or reflector positioned below the subject’s face.
- Impact: The key light is placed close to the subject to ensure high-intensity, soft light, while the fill light or reflector below bounces light back onto the subject’s face, reducing shadows. The balance between these two light sources, governed by the Inverse-Square Law, ensures that the lighting remains even and flattering.
Conclusion: Using the Inverse Square Law in Photography
Now that you understand the power of the Inverse-Square Law and its application in various lighting setups, it’s time to put this knowledge into practice. Experiment with light placement, play with shadows and fine-tune your setups to see the dramatic effects you can achieve. Each adjustment brings you closer to mastering the art of lighting, transforming your photographs from ordinary to extraordinary. Dive into your next shoot with confidence, apply these principles, and watch your creative vision come to life. Remember, the key to mastery is practice and experimentation—let your passion for photography guide you as you explore the endless possibilities of light.
Capture Every Moment With Confidence
Perfecting your lighting techniques requires your full attention and creativity. With ProGrade Digital memory cards, you can focus on getting the lighting just right, knowing that your images are stored safely and securely. Find the ideal memory card for your camera with our free compatibility charts and capture every moment with confidence.
