Have you ever wondered what the secret sauce of a stunning picture is? How to capture that moment in time and make it look like a work of art?
There’s a lot to consider––lighting, composition, and focus, for starters. But one of the essential factors in the mix is the exposure triangle.
In this article, we’ll look at what it is, how it works, and how to use it in photography to nail the correct exposure in your photos.
What is the Exposure Triangle?
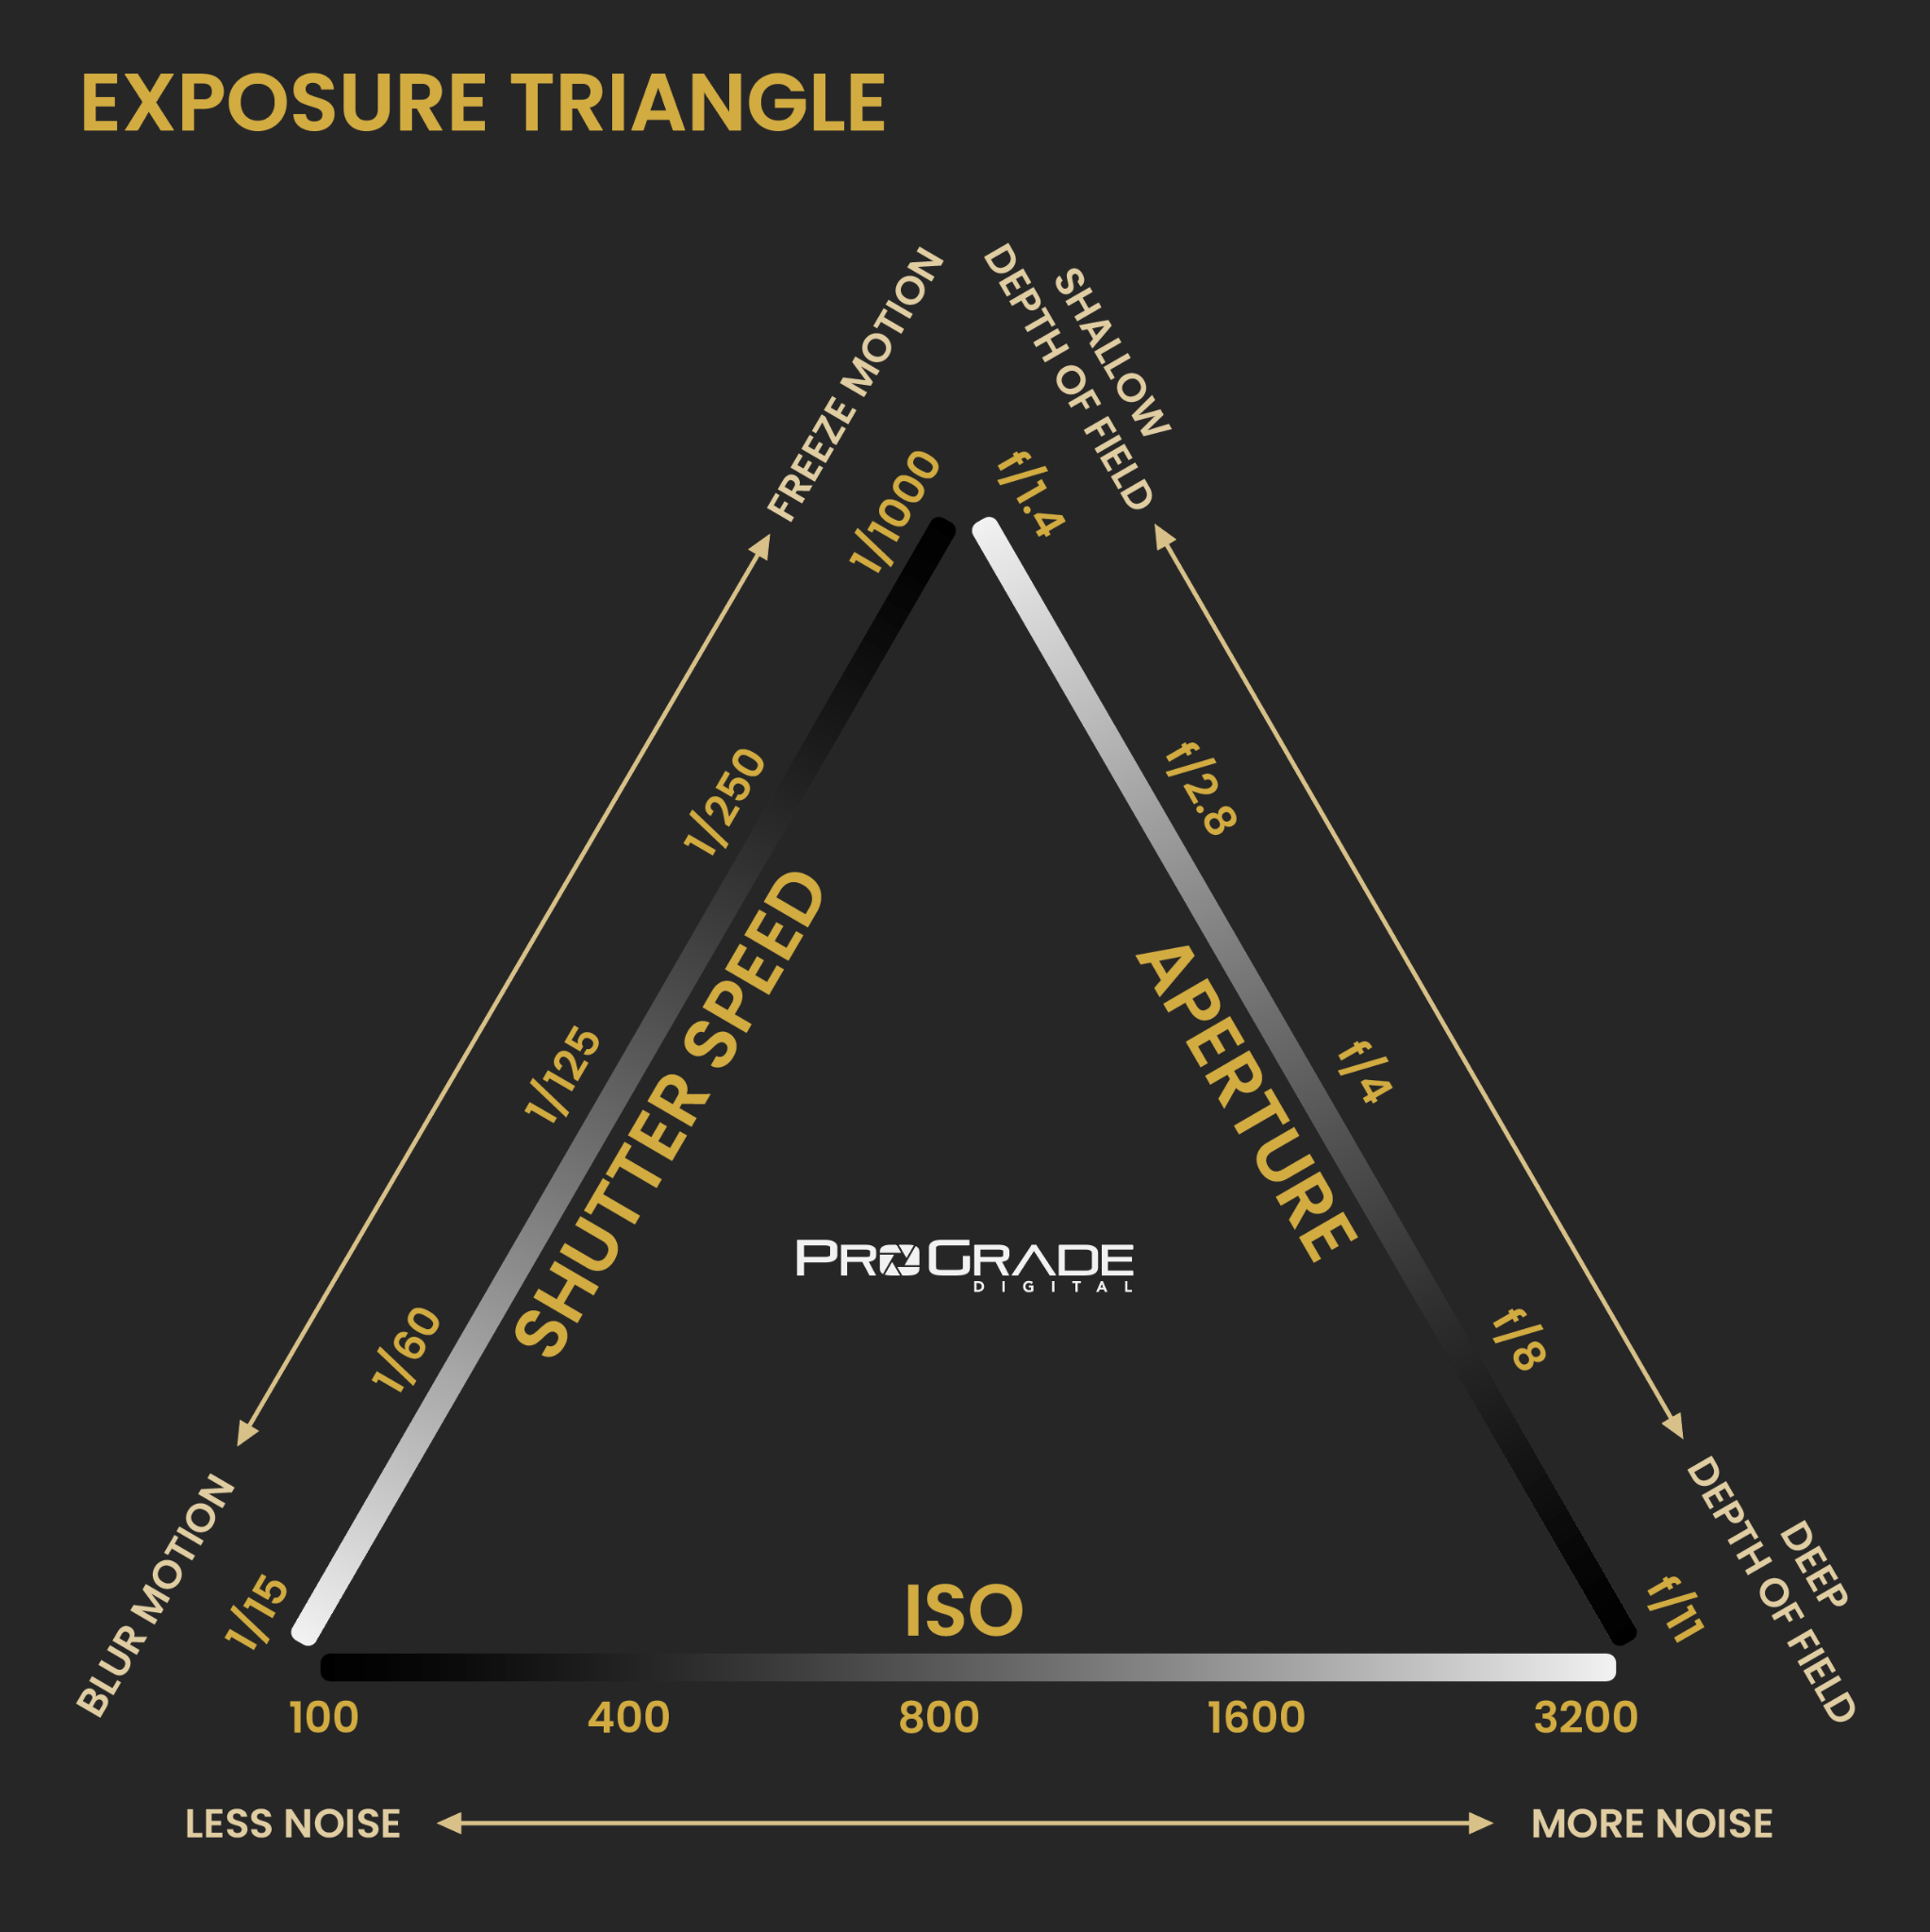
The exposure triangle is a photography term that refers to the relationship between aperture, shutter speed, and ISO. These three elements all control the amount of light that enters the camera. Yet, each affects the appearance of the image in its own way.
Understanding how exactly the trio works together helps you gain greater control over your photos’ appearance and achieve perfect exposure every time. No matter what lighting conditions you are in.
How Does the Exposure Triangle Work?
Getting the exposure right is all about controlling how much light enters the camera and for how long. That’s where aperture, shutter speed, and ISO come into play. To nail the necessary balance between the three, you need to understand how each of them works.
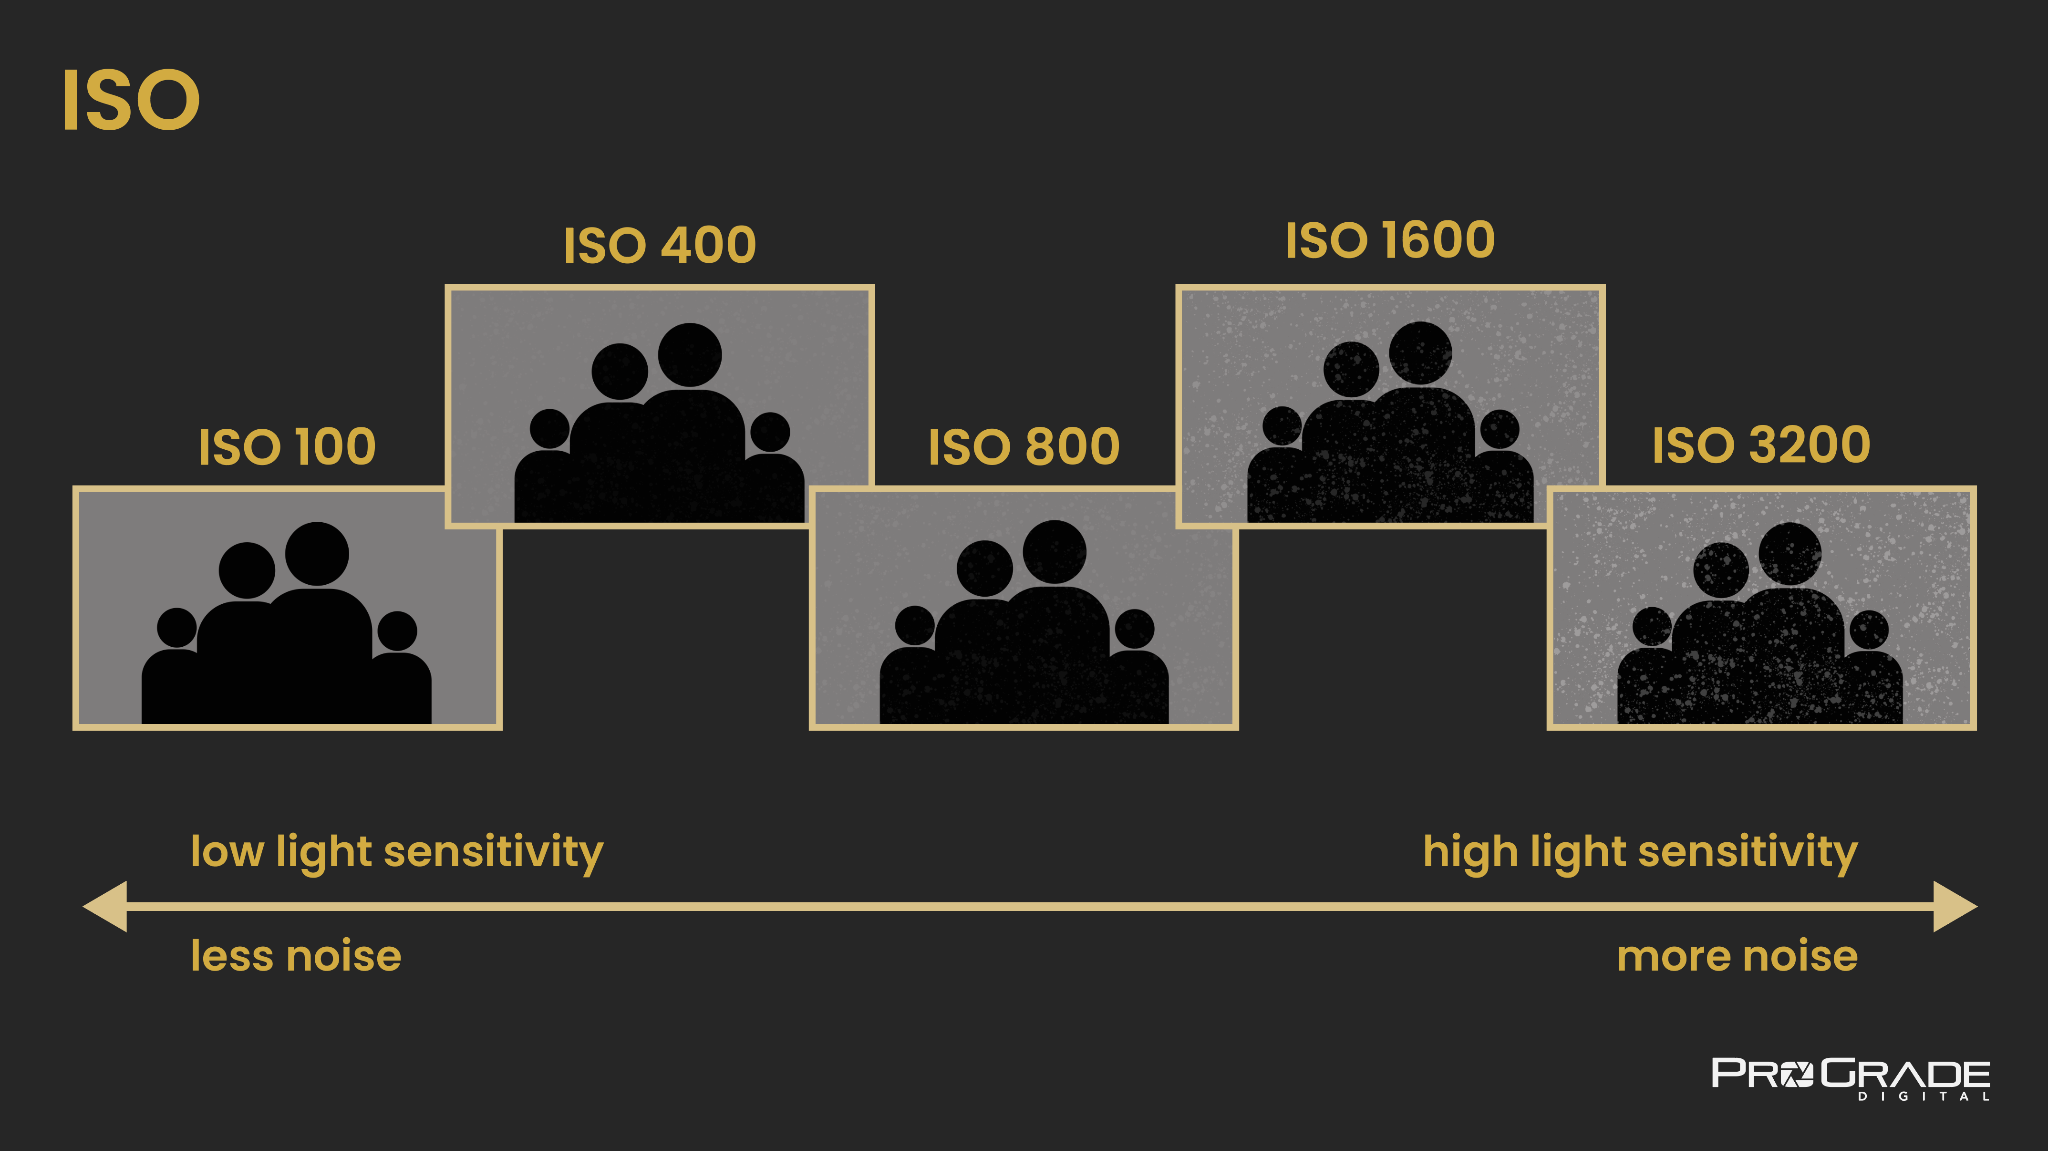
ISO
ISO is a term used in photography to specify the camera’s sensitivity to light. The higher the ISO number, the more sensitive the camera is to light and the less likely you will get a blurry picture from the camera shake. However, increasing the ISO also increases the amount of noise in the photo. Most digital cameras have an ISO range of 100-6400, though some go up to 12800 or even 25600.
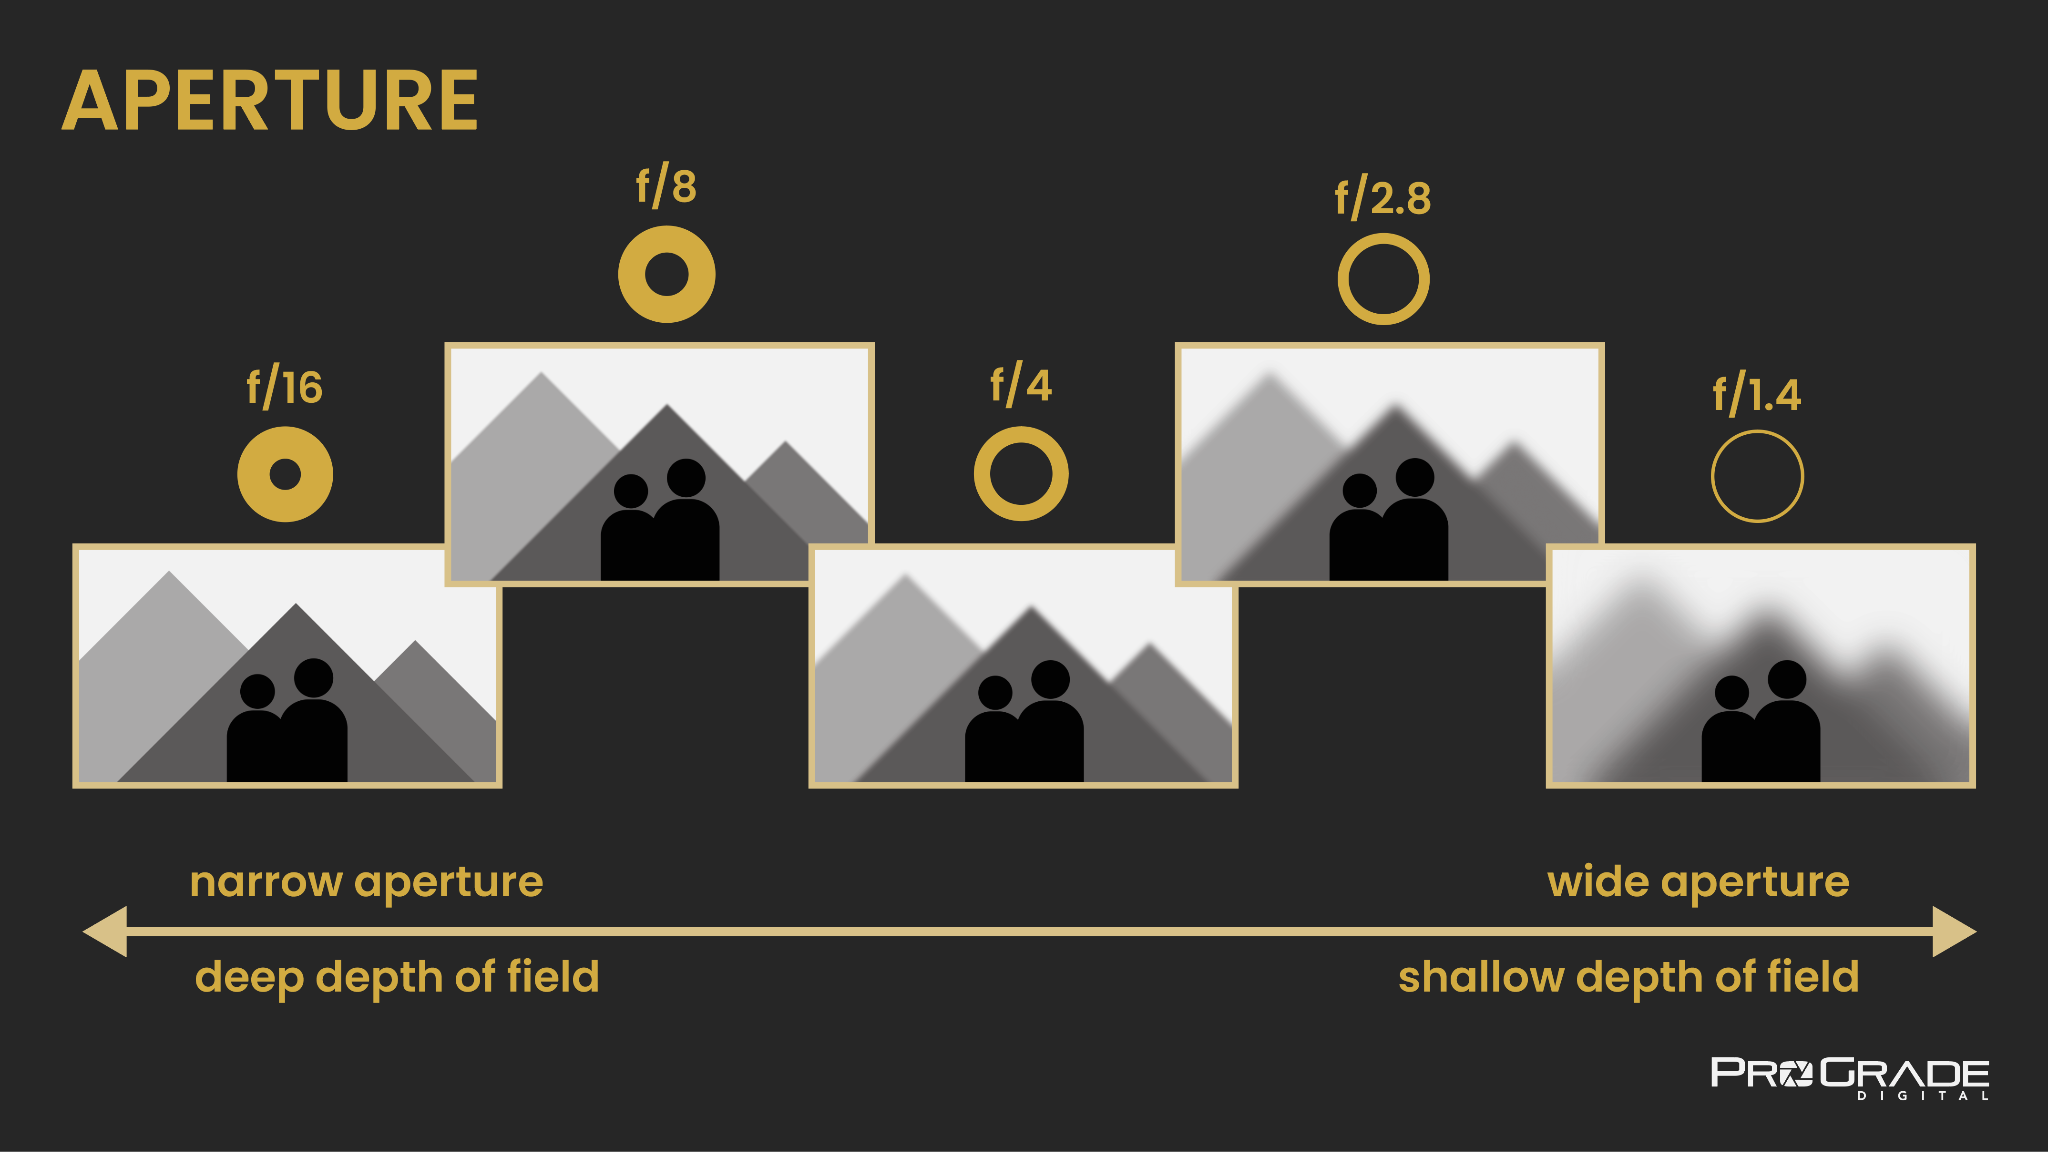
APERTURE
Think of the aperture as the iris of your eye. It is the opening in a lens that controls how much light enters the camera, which in turn affects the depth of field or how much of the photograph is in focus. A small aperture will give you a deep depth of field, while a large aperture will give you a shallow depth of field. Aperture is measured in f-stops, with a higher number indicating a smaller aperture.
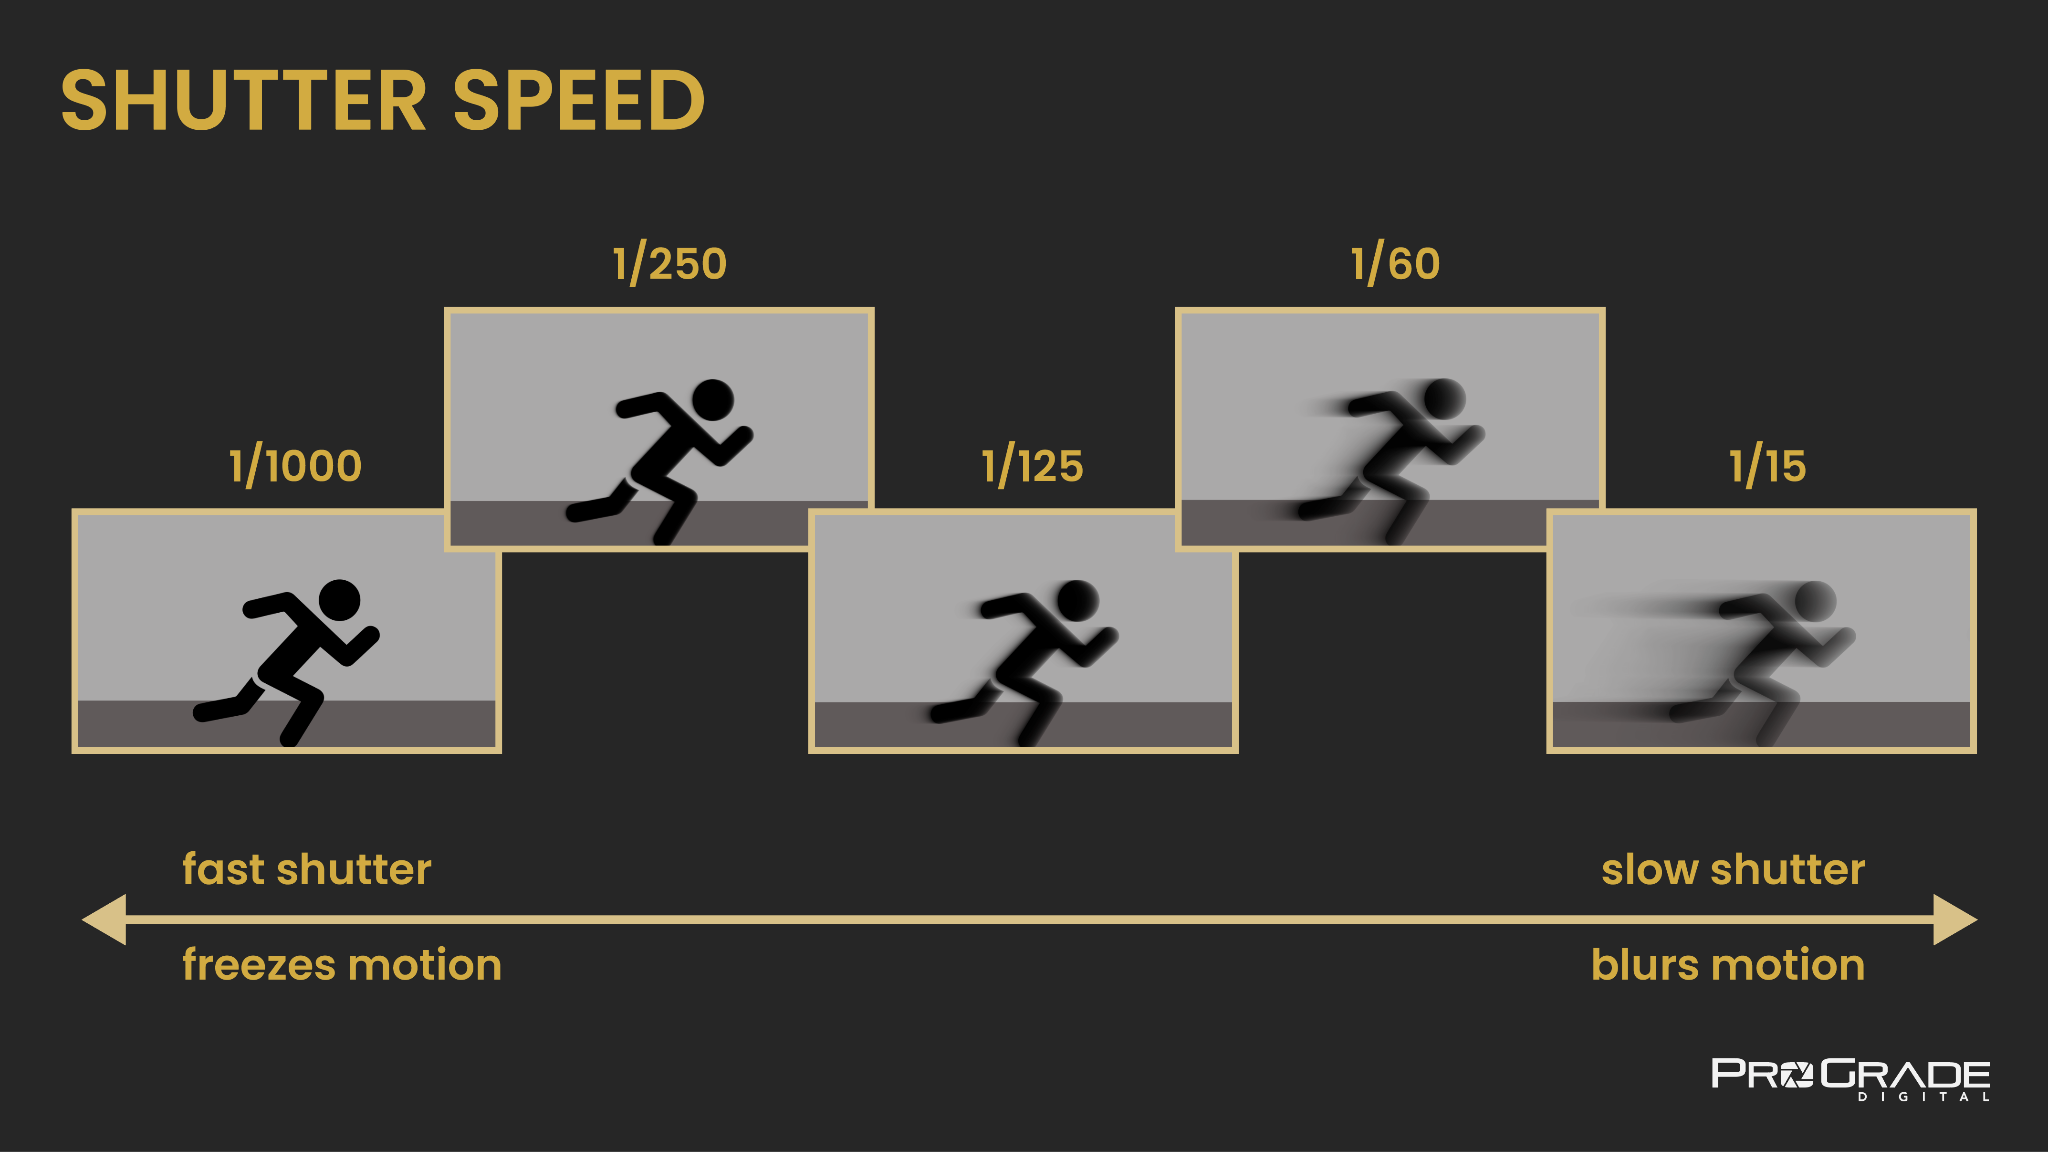
SHUTTER SPEED
While the aperture determines how wide the lens is opening, the shutter speed determines how long the lens stays open. Shutter speed is the time it takes for a shutter to open and close when taking a picture. It is measured in seconds or fractions of a second. Shutter speed affects how much motion is captured in the photo. A fast shutter speed will stop motion, while a slow shutter speed will blur motion.
Now that we’ve broken down all three elements of the exposure triangle, you probably have a pretty good understanding of how ISO, aperture, and shutter speed each affect exposure. So let’s put it all together to understand how to use the exposure triangle in photography.
How to Use the Exposure Triangle in Photography?
Using the exposure triangle for getting the correct exposure comes down to two things: understanding the exposure triangle stops and knowing how to balance ISO, aperture, and shutter speed.
Exposure Triangle Stops
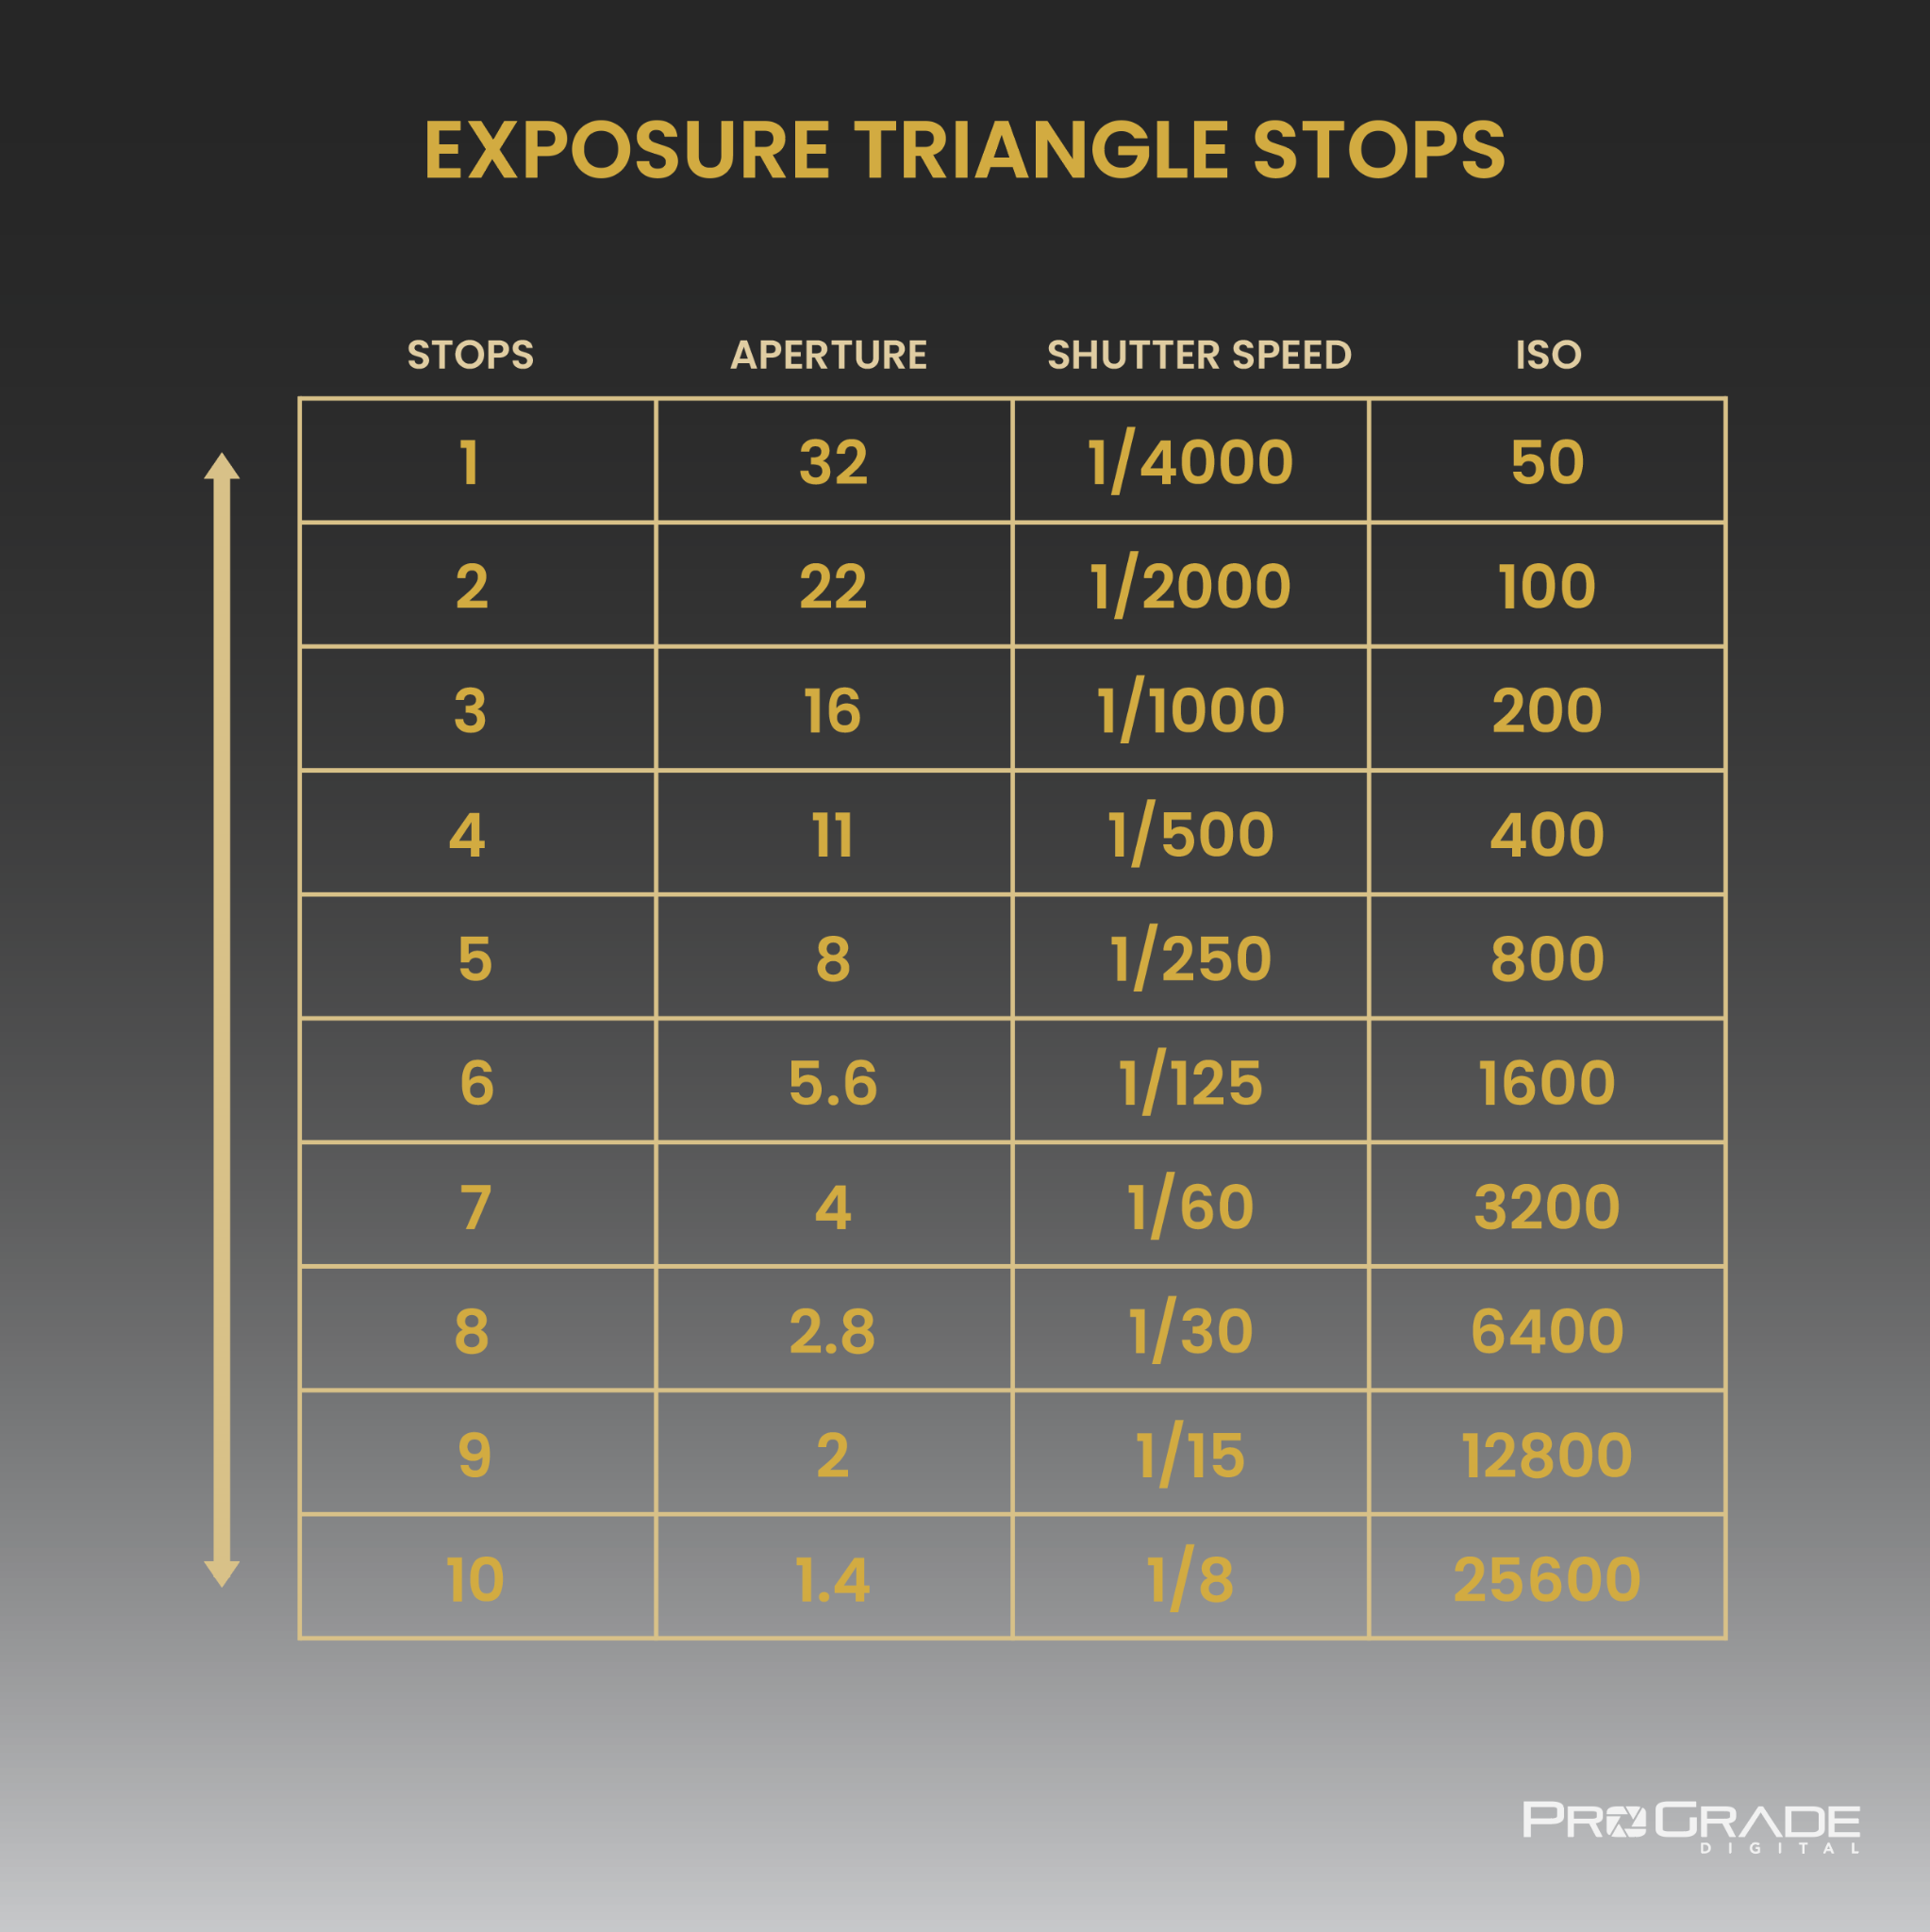
Exposure triangle stops or photography stops are a way to measure the amount of light that hits the camera sensor. This is essential for calculating and balancing all three sides of the exposure triangle. With each added stop, you double the amount of light and vice versa.
For example, when you increase the shutter speed from 1/125th of a second to 1/250th, you’ve dialed back one stop, halving the amount of light. Similarly, when you increase the ISO from 100 to 200, you’ve added one stop and doubled the amount of light landing on the sensor.
The following chart makes it easier to understand.
Creating Balance in the Exposure Triangle
Whenever you change one of the elements in the exposure triangle, you must compensate by modifying the other two as well.
The general idea is simple. When you decrease the amount of light landing on the camera sensor by narrowing the aperture, you need to use a slower shutter speed or a higher ISO to compensate for the light loss and keep the exposure triangle in balance.
Here’s an example:
Say you’re shooting your dog running around in the park during bright daylight. Your ISO is 100, shutter speed 1/500, and aperture f8.
Your camera’s exposure value (EV) is where you want it to be, yet you’re unhappy with a bit of a blurry dog and decide to decrease the shutter speed by 2 stops – from 1/500 to 1/2000.
In that case, you must compensate for the loss of light by either:
a) increasing aperture 2 stops – from f/8 to f/4,
b) increasing ISO 2 stops – from 100 to 400, or
c) increasing both aperture and ISO by 1 stop – from f/8 to f5.6 and from 100 to 200, respectively.
That way, you’ll keep the proper balance in the exposure triangle. However, never base your decisions solely on math. Always consider the trade-offs of each and approach to achieving this balance based on the look you are after.
Exposure Triangle: Final Words
Now that you understand how the exposure triangle works, start putting it into practice. Mastering it to perfection may take some trial and error at first, but soon, you’ll be taking photos that look just the way you want them to.
Ready to Take Your Photography Workflow to the Next Level?
We at ProGrade Digital are all about empowering photographers and cinematographers. We design and manufacture lighting-fast and highly reliable memory cards and workflow readers for dedicated professionals. So join the ProGrade family and maximize your creative potential!