There’s something about photographing star trails that just feels magical. Watching the stars seemingly “move” across the sky is mesmerizing, and it’s no wonder that this type of photography is so popular. If you’re looking to capture this beauty through your camera lens, there are a few things you should know first. Here’s an overview of what to expect when photographing star trails and some tips to help you create stunning images.
What is Star Trail Photography?
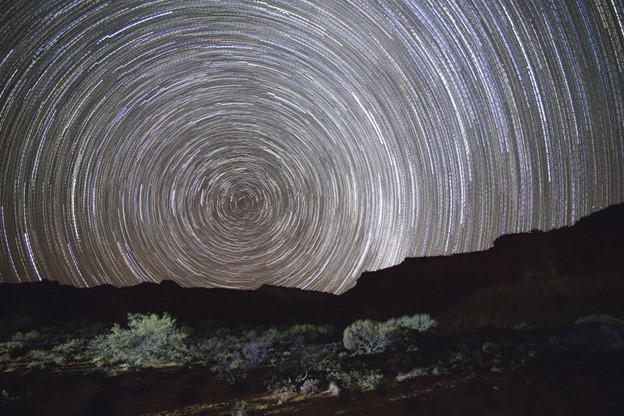
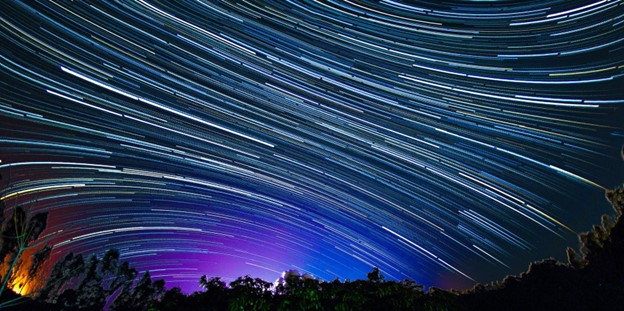
Star trail photography is a type of long-exposure photography where the camera shutter is left open for an extended period of time in order to capture the apparent motion of stars in the night sky. This results in star trails or streaks of light that radiate out from a central point. Depending on the length of the exposure, star trails can vary from faint and barely visible to bright and bold.
The great thing about photographing stars is that, unlike deep space astrophotography, it doesn’t require specialized equipment like a star tracker and telescope to achieve phenomenal results. You simply need a DSLR or mirrorless camera, a sturdy tripod, a wide-angle lens with a maximum aperture of at least f/2.8, a remote shutter, and a large memory card.

The Basics of Photographing the Night Sky
There are two main styles of star trail photography: star lines and star circles. Star lines are an effect where the star trails appear to streak in a fairly straight line across the sky. Star lines are created by photographing stars in the east or west direction. This is because the Earth’s rotation causes the stars to appear to move across the sky from east to west.
Star circles are star trails that form a complete circle around the north or south pole star. Star circles are created by photographing stars in the north or south direction. This is because the star trails will appear to rotate around the north or south star, depending on which hemisphere you’re in.
So you see, whether you achieve star trails that are lines or complete circles simply depends on which hemisphere you’re in and which direction you aim your camera.
Planning Your Star Trails Photos
If you want to get the best out of your star trail photography, it helps to take care of a few things before you ever touch your camera:
- Find the darkest location possible: While it may seem dark to your naked eye, with long exposure photography, your camera is able to pick up a surprising amount of light from the atmosphere. That’s the point, right? But you only want it to pick up the stars and celestial objects, not the light from street lamps and nearby traffic. A light pollution map will help you locate the darkest area near you.
- Check the weather forecast: Try to shoot on a clear night with little to no cloud cover. Depending on your camera, lens, and the photo you want to achieve, you could be shooting for several hours, so you don’t want the weather to take a turn for the worse unexpectedly.
- Know when astronomical events are happening: This goes hand in hand with checking the weather forecast, but you’ll also want to ensure there aren’t any major astronomical events happening that could ruin your star trail photo. For example, if there’s a full moon, the extra light will make it harder to see star trails. The best time to shoot star trails is during a new moon.
- Consider the direction you want your star trails to go: As we mentioned before, star lines are created by photographing stars in the east or west direction while star circles are achieved by pointing your camera toward the north or south pole star. Plan accordingly!
- Think about your composition: Just because star trails are the star of the show (pun intended), that doesn’t mean you can’t get creative with your composition. Use foreground elements to add depth and interest to your photo or frame your star trails with trees or mountains.
- Give yourself enough time: Shooting star trails takes time and patience. Make sure you give yourself enough time to set up, shoot, and enjoy the process. If you’re including landscape or foreground elements in your composition, get to your location before dark so you can more easily compose your shot.
Settings for Photographing Star Trails
If you’ve ever shot long-exposure photography before, then you know it can be a process of trial and error. However, there are some basic settings you can start with and then tweak from there:
- Set your camera to Bulb mode, as most cameras don’t allow for a shutter speed longer than 30 seconds. Additionally, you should use a remote shutter release to avoid motion blur.
- Set your lens to manual focus and set it to infinity.
- Set your lens’ aperture to its maximum to allow the most light to reach your sensor.
- Use the lowest ISO possible. Most astrophotography, like Milky Way photography, calls for a high ISO, but since you’ll be shooting with very long exposure times, you can keep your ISO low. Start at ISO100. Do a 30-second test shot to make sure you’re able to record stars at these settings. If none are captured, increase your ISO.
- Your shutter speed will vary greatly from one star trail photo to the next, depending on the focal length of your lens and your camera’s sensor. Some star trails can be shot in one hour but some need much longer. Do a test shot at 15-minutes to get an idea of how bright the stars are and how long you’ll need to shoot to get long star trails. Adjust your settings as necessary.
- It’s always a best practice to shoot in RAW. This will record the most data and give you the most flexibility when it comes to editing. RAW images will take up quite a bit more file space, so be sure you have a large memory card in your camera.
- If you shoot in RAW, the white balance can easily be changed later, but a good setting for star trails is “tungsten,” if you want to give your sky crisp, cool blue tones.
- Be sure to turn shake-reduction and noise reduction OFF.
- Make sure your battery is fully charged before you start.
Of course, these are just general guidelines and you’ll have to experiment with your camera to see what settings work best for you. But the above settings should help you get started.
How to Shoot Star Trails
Once you’re out in the field and ready to start shooting star trails, there are a few things you can do to take your images to the next level.
1. Use mobile apps
It helps if you’re a master of astronomy and can identify the stars in the night sky. But most of us are not — in that case, take advantage of some of the many mobile apps out there to make planning your shoot so easy! PhotoPills is a robust astrophotography planning app that will even tell you what settings to use for star trails. Stellarium is great for quickly visualizing the night sky and what celestial objects will be in what part of the sky. Dark Sky and Nightshift are great for checking weather conditions and near-future forecasts. Light Pollution Map is for locating dark sky locations, and DarkLight will turn your Android smartphone’s screen into a photo-safe red flashlight.
2. Layer your star trails
This is an advanced technique but can produce some really stunning results. By shooting a series of shorter star trail images and layering them on top of each other in Photoshop or with a post-processing app like DeepSkyStacker, you can create the illusion of longer, more winding star trails. The extremely long star trail photos you see are most likely stacked images.
3. Shoot with wide-angle lenses
The wider the field of view, the more dramatic your star trail photos will be. So definitely break out those wide-angle lenses! Prime lenses around 14mm or 16mm are ideal for this type of photography, but 24mm or 35mm lenses will do the trick.
4. Get creative with foreground elements
Foreground elements can really help add visual interest and dimension to your star trail photos. So experiment with different types of objects — a group of trees, a lone tree, a fence, a barn, mountains, rocks, or an old rusty truck. And don’t forget about the other objects in the sky! If you’re shooting in an area with very little light pollution, you may be able to capture the Milky Way or the Northern Lights in your photo as well.
5. Post-process your images
You’ll capture some beautiful images right out of your camera, but editing is when the magic of night photography really happens. Use a post-processing program like Photoshop to make basic adjustments and remove noise, remove distracting elements, adjust white balance, exposure, & contrast, sharpen details, and enhance color to bring out the beauty of your photo.
Final Thoughts
Star trail photography can be a challenging and fun way to experiment with photographing the night sky. When you get it right, the results are absolutely stunning. We hope this guide has given you the information and inspiration you need to get started! Just remember to have patience, experiment, and enjoy the process.
The Best Memory Cards for Shooting Star Trails
If you’re planning on shooting star trails, you’ll need a memory card that can handle the large file sizes and high data transfer speeds. What’s more, you need a card that’s reliable after several hours of taking a once-in-a-lifetime shot. ProGrade Digital memory cards are the #1 choice for professional photographers due to their unparalleled quality and speed.